Showing posts with label cloisonne. Show all posts

Thursday, December 12, 2013

Silver wire wrapped abstract enamel and cloisonne pendant in blue


A few months ago, I made an enamel and cloisonne pendant for my mom's birthday. She likes blues, so I created an abstract design that incorporated different shades of blue: aqua, turquoise and nitric blue, which is a deeper version of the hue.

I really liked how this necklace turned out and planned to make another ... and finally designed another version of it. This one doesn't look exactly the same, plus the blues are a little different (I used water blue, aqua and sky blue), but the basic idea is the same:
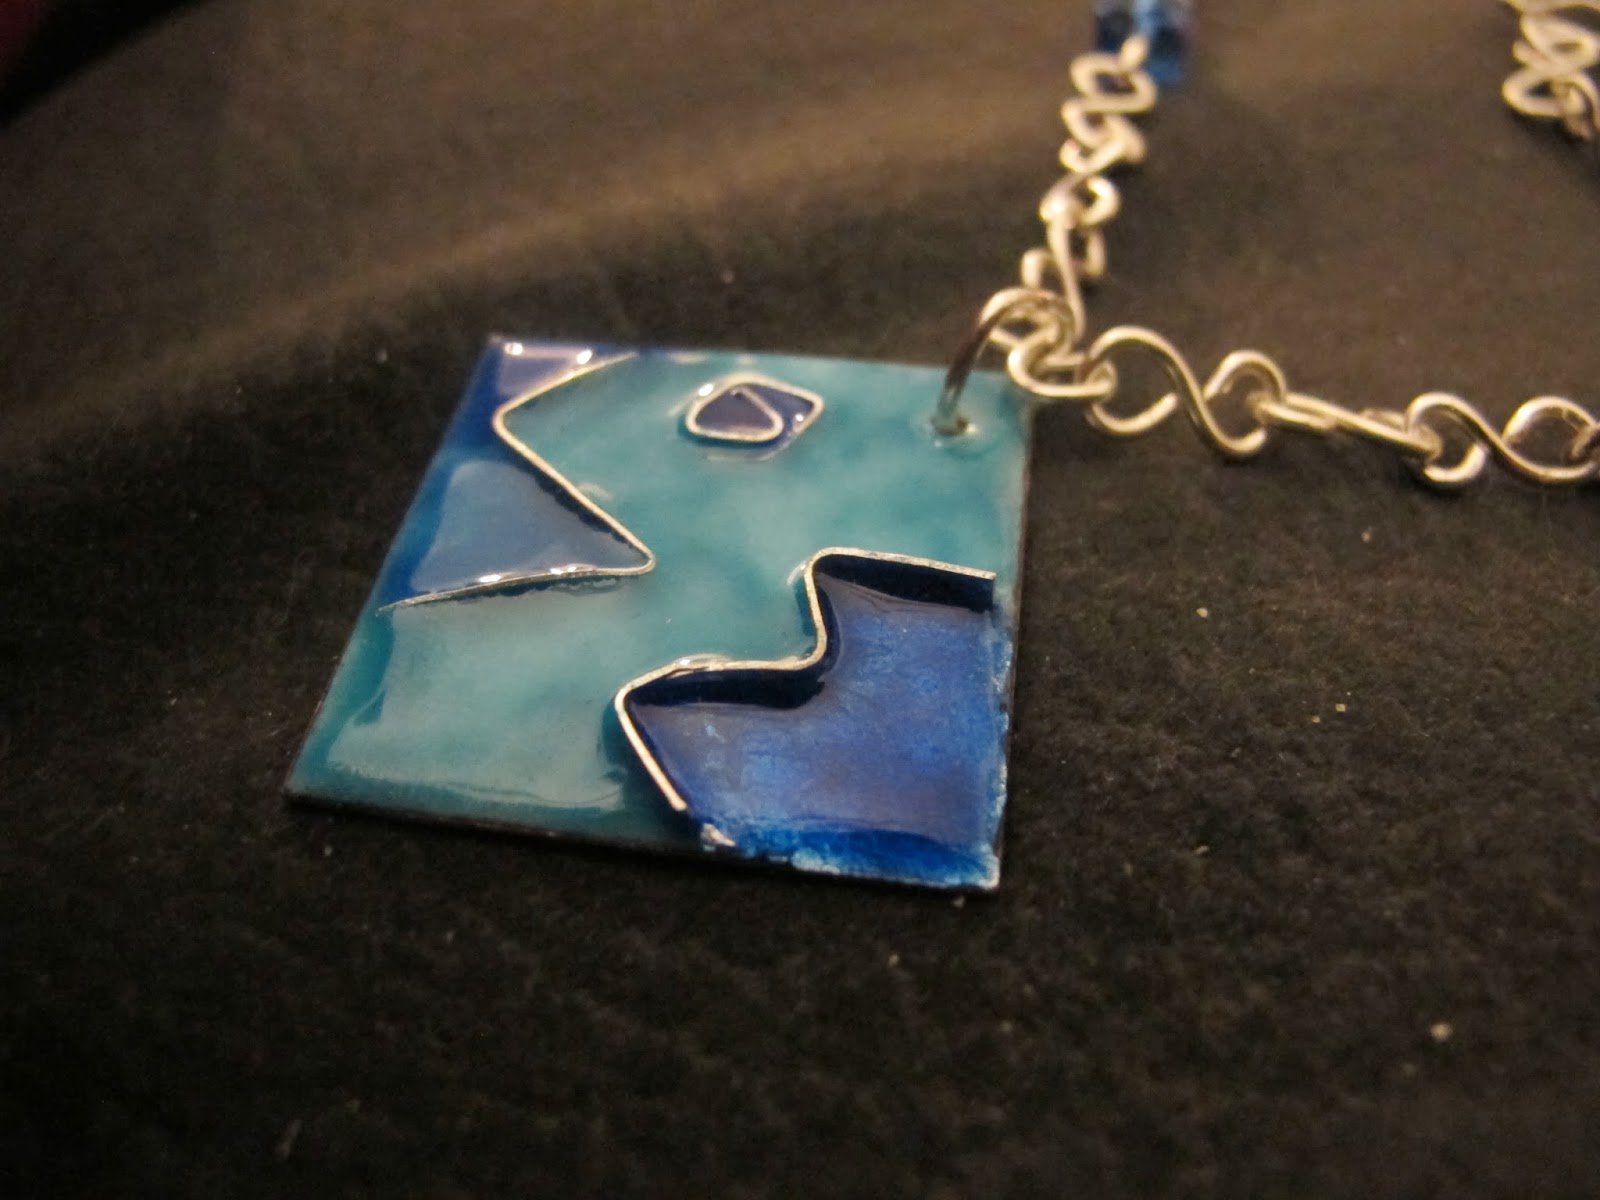
What's interesting about this newer piece is that I used a bit of silver foil in the design; it's beneath the darker blues. If you look closely, you can see that the color shimmers a bit more than in the other areas.

I also didn't actually use cloisonne wire for this pendant because it's the end of the semester and I ran out. Instead, I improvised and used fine silver bezel wire, which is meant for wrapping cabochons and gems. Bezel wire is a bit thicker than cloisonne wire, so I had to slice it down the center to make it a more suitable length. But fine silver is fine silver and it worked! You just can't use sterling silver when making an enamel piece because it won't heat correctly. As with the other necklace, I made the chain from silver plated wire and added blue crystals.

My plan (among many others) is to do a little series that features these geometric pendants. I have one class left before our winter break. I think I might make another version of this using enamels in purple, yellow and raspberry -- a big change from these cool blues. What do you think?

To purchase my jewelry, head to Naomi's Designs or MayaGirl Creations.

Wednesday, December 11, 2013

Silver wire wrapped pink flower enamel pendant with crystals


For most of this semester I've been making champleve pieces in my enameling class. However, a few weeks ago, I went back to designing a simple enamel and cloisonne pendant. I hadn't made one in a long time and I wanted to make sure that I didn't forget how to do that particular technique.

I arranged the cloisonne into a classic flower design. It may look pretty simple, but setting the flower petals turned out to be trickier than I imagined because cloisonne wire sometimes moves a bit when the piece is fired in the kiln. With abstract pieces this isn't that big of a deal, but it can be a pain when you need the cloisonne to be in an exact position -- like with a flower. I solved the problem, though, by firing a bit of the cloisonne at a time. This way, the remaining pieces of wire could lean against the already-fired cloisonne and would stay in place.

To get this particular shade of blue, I did some color combining and mixed water blue enamel with nitric blue. Just to be clear, you can't really mix enamels when the glass is in the dry powder stage -- but you can layer colors to get some shading. So I fired the water blue first and then layered the nitric blue on top of it to get this rich hue.

The flower's color is called raspberry. I love it because it's such a deep shade of pink and it really stands out against the blue. In its powdered form, it doesn't look like the raspberry will be very bright -- in fact, it's kind of pale -- but it looks a lot different once its fired and glossy. This is the case with a lot of enamels, actually; they look different once fired and cooled, which is why it's important to make a test strip of colors.

My finish for the necklace is pretty simple: I made a silver wire wrapped chain and added a few blue crystals... but I think the end result makes a nice showpiece. This is the kind of necklace that you wear for special occasions because it's so eye-catching, though it works with casual outfits, too. And flowers will always be fashionable in some way; they're a very classic design.

To purchase my jewellery, head to Naomi's Designs or MayaGirl Creations.

Sunday, April 28, 2013

Back from Japan, Back to Making Handmade Jewelry


Wow, it's been a very long time since I've written a post, but with good reason: I've been in Japan! My husband and I visited Tokyo, Hakone, Nara, Nikko, Kyoto, Osaka and Narita -- so we were quite busy. The trip was incredible, but exhausting and I'm still not entirely over the jetlag. Still, I'm so glad that we went and got to experience such a beautiful country.

Though I put work on the backburner while we were away, jewelry still came up at times. I was surprised to see how much my jewelry making skills applied to Japanese art. For instance, the temples that we saw in Nikko were extremely ornate; at one portion of a shrine, there was a design that looked as if it were implanted into the metal. Jon wondered aloud how that was done and I explained that it looked as if the artists had used a champleve technique, where the metal was etched or engraved and then filled with enamel/glass. He was impressed and it was kind of cool to be able to "dissect" the designs.

Jewelry came up again, more directly, when we visited a craft center in Kyoto. They offer Japanese art classes there and one if for enameling and cloisonne. However, they don't let the students apply the cloisonne wire or even place the piece in the kiln, so I didn't bother to check it out. It's funny, though, that I traveled thousands of miles to come across a class that I take at home!

I wasn't that interested in the Japanese jewelry, but I really do love the other types of crafs, especially the little dolls. My favorite are the washi dolls, which are made from a special type of paper and are folded origami-style. I'd love to learn how to make one of these, but they look complicated. I also like the wood boxes that have intricate patterns. We didn't buy too many souvenirs, but I did get a few dolls and a small box.

Now that I'm back home, I'm trying to get back into my jewelry/writing. I had my enamel class on Tuesday and am closer to completing my enamel hamsa (hand) necklace. I hope to finish it tomorrow, actually. I'm also signing up for a craft fair that's on May 11. This will be my first of the season so I hope it goes well. Make sure to check out my jewelry stores Naomi's Designs and MayaGirl Creations.

Until then, here are some of our trip photos from Japan, taken by my husband Jonathan. Enjoy!

Mt. Fuji! Did we get a beautiful day to see this famous volcano, or what?

Pagoda at Nikko:

Neon night in Osaka:

Kinkakuji Temple, Kyoto:

Saturday, March 9, 2013

Next project: enamel and cloisonne cat pendant and hamsa pendant


For most of my enamel jewelry projects, I've been working with squares or circles, but I'm ready to move on to more complicated shapes. Next, I'm going to make an enameled and cloisonne cat pendant and hamsa (a Judaic/Middle Eastern symbol that's shaped like a hand and wards off the evil eye) pendant.

This afternoon, I cut the shapes from 20 gauge copper sheet metal. In the past, I've cut metal using a jeweler's saw, but that can take hours. This time, I used super strong Joyce Chen scissors and they ripped right through the copper! It wasn't easy as I had to put a lot of force into it, but they worked. Now I'm eager to try these scissors on 22 or 24 gauge copper because they'll probably cut through the metal like butter.

I spent about an hour filing my cat and hamsa and crafted copper cut-outs that look pretty good:

You can see the outline that I drew on the hamsa. I plan to put the traditional (evil) eye in the center of the palm, but cover the rest with an abstract cloisonne design. I think I'll use bold jewel tones for this so it looks a little like stained glass.

I also plan to do an abstract cloisonne on the cat pendant, but I'm going to use "cat-colored" enamels: browns, black, ginger and white. I'm basing this a little on my kitty, Maya, who's multi-colored so my enamel cat will have those hues.

I have to say, I really got a kick out of using the Joyce Chens. I felt like a superhero as I cut through that metal! I'm also enjoying my enameling class this semester. I'm getting to do some more complex pieces and we have a good group of people. So far, no one has dropped out and everyone seems to be more engaged than in some of my former classes. In my first jewelry class, we went from about 12 students to three over the course of the semester, so it's nice to be a part of a group where everyone is interested in the craft.

On Tuesday, I hope to get as far as setting the cloisonne. I'm going to see if I can buy some studio time after class so I can finish my projects. We'll see. But now that I have my copper cut-outs, I'm eager to get started!

To purchase my jewelry, head to Naomi's Designs or MayaGirl Creations.

Tuesday, January 15, 2013

Silver cloisonne and enamel heart earrings


It's less than a month 'til Valentine's Day and I'm continuing to build up my stock of holiday-related products. I'm not a huge fan of V-Day; truthfully, I think that you should celebrate your love for someone every day of the year. On the other hand, I really like hearts so I'm happy to have an excuse to make heart-themed jewelry!

My enamel teacher suggested that I start making things other than individual pendants so I can get used to designing series, so I made a pair of cloisonne heart earrings. They're a pretty simple design -- a deep red heart with a pink and purple background -- but they're sweet and pretty, and appropriate for Valentine's Day.

Of course, being well, me, the process of making this didn't go smoothly. First, I dropped one of the little cloisonne hearts on the floor of the studio. Before I knew it, everyone in class was on their hands and knees as they scrambled around looking for it. I felt pretty embarrassed, but it was kind of them to help out. We never did find the heart, but it wasn't a big deal; I just made another.

Then, for some reason, the purple counter that I used (the enamel put onto the underside of the earrings) glazed over into a lumpy mess. I guess I put it on too thick in some spots? I ended up applying a third layer (usually I use two layers of counter) and that seemed to do the trick. It's still lumpy, but there are no cracks. I added an additional layer of glass powder to the front side to even things out, so hopefully, the enamel will hold steady all around.

One good thing is that I've become much more skilled at adding the cloisonne wire. The first few pieces I made fell apart somewhat because the wire was overheated and melted. But I now know to take the piece out a bit before a minute is up. This seems to do the trick!

I wish the earrings' colors were better in this photo, but it's dark and rainy here and I was eager to show these off. If it's brighter tomorrow, I'll try to get an improved pic. Still, you get the basic idea. I'm pleased with how my earrings turned out and am all set to begin my next project: a bracelet with enamel and cloisonne links!

To purchase my jewellery, head to Naomi's Designs. To purchase my children's jewelry, head to MayaGirl Creations. To purchase my novel, check out REVENGE OF A BAND GEEK GONE BAD.

Thursday, January 10, 2013

Shades of blue enamel and cloisonne pendant


I had a great time in my enameling class this week. First up, I made this really cool enamel and cloisonne pendant using glass in different shades of blue. It's not yet finished, but I plan to attach it to a handmade silver chain that's adorned with blue AB crystals. It's going to be gift for my mom's upcoming birthday, so shh!

There are only two classes left in this semester and I'll admit, I was seriously considering taking another class this spring. I've done enamel for three semesters now and am interested in trying out a different technique. However, after I made this piece, my teacher came over to admire it and said to me, "You know, you're really getting quite good at this." She then went on about some ideas for projects that she has for me for next semester. And so I signed up for enameling again! My teacher's praise means a lot to me and if she has faith in my skill, I would like to improve upon it. I really do like enameling, anyway. It's one of the most popular classes offered so it's not like she has to grub for students; her eagerness to work with me is genuine and I want to take her up on it.

Meantime, I'm excited to put this necklace together and just hope that my mom likes it! I'll post the finished product so keep checking in.

To purchase my jewellery, head to Naomi's Designs. To purchase my children's jewelry, head to MayaGirl Creations.

Tuesday, July 24, 2012

More abstract enamel and cloisonne pendants

Last night's enameling class turned out to be a really productive one! I managed to complete 2 1/2 pendants, with very few mishaps.

Once again, only three students showed up. I'm not sure why people would skip out on a class that cost a bit of money, but I liked the quiet, as well as not having to wait for equipment. All of us, including our teacher, just sat there working on our projects without interruption. This teacher, who is very young, acts more like a guide than a teacher; if you have a question, she'll answer it, but other than that, she pretty much stays out of the way. I like that, too. Some teachers can hover a bit and correct every move you make -- and while I appreciate learning the proper way to do something -- that can get annoying when it's done in excess. One teacher I've had is really sweet but whenever you ask for help, she ends up actually doing that step for you. I like being able to try things and make mistakes along the way.

Of course, my inability to deal with anything relating to metalsmithing has come up in this class. I just can't make the strikers (the things you use to spark a fire when using the torch) to work. No one else is having problems, but I strike and strike ... and nothing. I did not have this issue in any other class. I had a lot of other issues, but not this. My teacher has tried showing me alterative angles to strike it, and I just can't get it. I always have to be helped. I think it might be because I have some circulation problems, or maybe I'm just that much of a wimp. There is one square striker that was working for me, but now it's broken. I'm thinking of buying my own because newer ones seem to work better, but I have only three more classes left. It's just annoying!

Anyway, here are the two completed pieces I made. The abstract square pendant was inspired by Mondrian. I love the bold colors and pop art feel. The second is just simple blue and light blue stripes, but it reminds me of the jewellery I sa in Greece.

To purchase my jewelry, head to Naomi's Designs. To purchase my children's jewelry, head to MayaGirl Creations.

Tuesday, July 17, 2012

Silver wire wrapped necklace with rainbow enamel butterfly pendant

This enamel and cloisonne butterfly pendant took sooo much work to make! There were a lot of mistakes made, and a lot of trial and error involved, but huzzah, it's finished! This thing gave me so much trouble that I nicknamed it "My Damn Butterfly" (like Madame Butterly, geddit? Haha).

I did not actually saw out the butterfly shape. I used a ready-made 24 gauge copper stamp. I figured that I could save myself a step in the process and make a few at once. I was wrong.

My first challenge involved balancing the butterfly on the trivet that's used for firing the enamel. I chose the smallest sized trivet, but when I tried to fire the pendant with a torch, it kept slipping off the trivet ... and the enamel kept cracking. I had to chip it off and reapply.

After three tries, I gave up and fired the pendant in the kiln. Happily, it stayed on the trivet and the enamel glossed over evenly.

Next, I had to add the cloisonne wire. I *almost* had this, except a piece fell off during the firing in the kiln and I had to do it over.

Finally, I hand painted it with colored enamel. Meanwhile, I also made a circular pendant with a cloisonne flower that took less time and was coming along great. And then I overfired that in the kiln. Dammit! The kiln usually fires low, but only three people showed up to class yesterday (guess most were not interested in spending a 95 degree F day working with a 1500 degree F kiln). Therefore, it was firing at a normal temperature and I didn't take much time. I should've left my flower in for 60 seconds, but I left it for 90 ... and the entire thing melted into an ugly mess. Anyway, I was determined to NOT melt My Damn Butterfly, so I carefully counted seconds and checked in after every 30. And it came out (though it stuck to the trivet and I had to carefully detach it)! Woo hoo! Here are some more views:

That silver wire wrapped chain is made from 18 gauge wire. I made it adjustable since I'm offering this necklace for kids. If it's adjusable, a child can wear it for a while since there's room in the chain for some growth.

You'd think that I've learned my lesson about enameling odd shapes, but I do like the look of this butterfly. It's cute, right? Only next time, I think I'll make my own.

To purchase my jewellery, head to Naomi's Designs. To purchase my children's jewelry, head to MayaGirl Creations.

Tuesday, July 10, 2012

Handmade enamel and cloisonne necklaces

I had my second enameling class in Brooklyn last night. There were fewer people so there was much less waiting in line for the minimal equipment. I'm also starting to get used to this kiln, which fires a lot lower than the ones at the Y. I basically need to keep pieces in for two minutes instead of one.

One thing I like about this teacher is she lets you do your own thing. She doesn't jump to help you, but is readily available if you do need her help. I like that she just lets us practice on our own. Most of the teachers I've had would jump in to correct me, and one -- who I liked -- would often end up DOING my work for me. I like being able to work on things without so much interference because I can then learn from my mistakes.

For instance, this teacher showed us how we can apply the first coat of enamel simply by torching the piece rather than putting it in the kiln. I actually really like this technique because you get to see the enamel glaze over and turn from pieces of sand into glossy glass. It looks as if you're frosting your jewelry! But this technique doesn't always work. I attempted to torch a butterfly shaped stamping ... and the force of the flame kept knocking it over. I tried about four times and finally gave up, simply putting the butterfly piece in the kiln. That worked! But at least I got to try and see what happens. As our teacher keeps telling us, with enamel, you can always redo and fix things. I like that!

I did manage to finish one piece. I made a small heart pendand for my kids' shop. After feeling like such a dunce in some of my other jewellery classes, it's nice to feel capable here. Some of the other students had a hard time getting the cloisonne wire to stay put, but I got it on the first try! Here is my red heart pendant necklace with fine silver cloisonne:

And this is the weird-looking abstract piece that I made last week:

To purchase my jewelry, head to Naomi's Designs. To purchase my children's jewellery, head to MayaGirl Creations.

Saturday, March 5, 2011

Silver bracelet with cloisonne beads

The first time I saw cloisonne was when I was in China with my parents. We visited an artist who made cloisonne pens, of all things, and I remember being intrigued as he painted these gorgeous floral designs onto a pen. I purchased one thinking it would be cool to use such a gorgeous writing instrument in school, but ultimately decided not to use it. To this day, I keep it safe in a velvet case.

The next cloisonne item I owned was a cloisonne Star of David necklace that my mom gave me for my birthday. The star was red and again had a floral-type design on it, and again, it was gorgeous.

That said, I have a pretty sentimental association with cloisonne and wanted to make a piece of jewelry that would showcase it. I'm not skilled to make cloisonne jewelry myself, but I did purchase some lovely cloisonne beads; it was just a matter of deciding what to do with them.

Ultimately, I kept things simple and designed this bracelet that alternates sterling silver wire squiggles with the cloisonne beads. I handmade the squiggles and tried to make each link about the same size of the beads; this way, they wouldn't overshadow the cloisonne. It turned out to be a very slender, but elegant piece of jewelry. Hopefully, whoever ends up buying this will appreciate it as much as I appreciated my cloisonne pieces.

To purchase my jewelry, head to Naomi's Designs or Naomi's Studio.