Thursday, January 28, 2016

Adventures in creating fused glass art!


Don't worry, I haven't abandoned my jewelry design practice. I'm still busy making wire wrapped and enamel pieces, and am in the middle of a few different projects. But I am absolutely LOVING my fused glass class... and everything feels shiny and new, kind of like the glass itself.

Last night's project was making a plate. I was hoping I'd get to make jewelry, but I understand that our teacher wants to show us various skills before letting us experiment on our own. Besides, as my husband, Jon, said, "It's great that you're making things that are beautiful AND useful." We often host parties so an extra plate will definitely come in handy!

Before we got to work, we were shown different design techniques. For instance, if you want your design to have very sharp and clear edges, the actual design needs to be at the bottom of the structure when the piece is placed on the kiln. If you want to incorporate artistic glass bubbles, you need to leave some spaces between the layers. And if you layer colored sheets of glass, you can play with the colors' tones. The possibilities seemed endless and a little overwhelming.

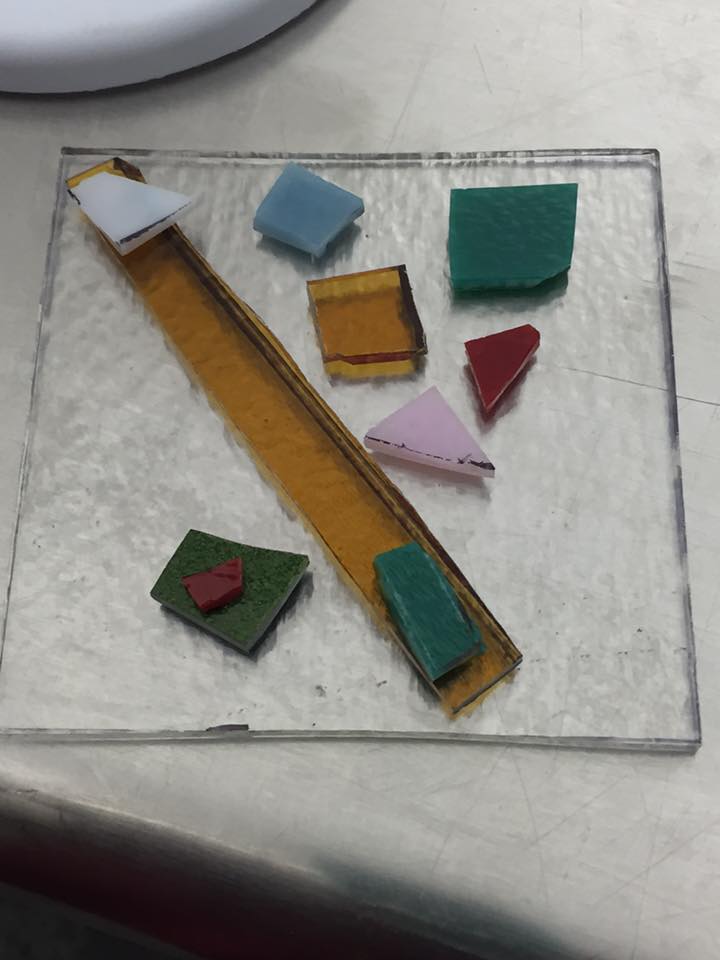
Since I love blues and abstract designs, I went for a geometric pattern made with jagged pieces of glass. I cut several shades of greens, blues and white into angular forms, then added an "explosion" of shards on either side:

This plate is going to have a black background. This means I had to use opaque colors because the transparents won't show up on the black. However, I fell in love with an aqua transparent, so my teacher suggested I lay some of it across the opaques to create new shades of blue. That's the dark stripe you see at the very bottom of the design.

Because I want my pieces to retain their angular shapes, I had to put my pattern at the bottom of the piece... which means that once I created the design, I had to take it apart and put it back together on the kiln. I then added a sheet of clear glass, and then finally the black. The design should ultimately look as though it's floating above the black background.

Once the plate has fused, we're going to learn how to "slump" the glass into a curved mold. I don't yet know how to do this, but am looking forward to finding out.

Meantime, I did learn many new skills and am realizing just how physical glass making is. In our three-hour class, I got to sit down for maybe five minutes. The rest of the time I was cutting glass, prepping the kiln shelf, setting the kiln, arranging my piece, buffing and smoothing the glass. It's a lot of work! But it was work that I enjoyed and definitely worth the effort.

While I was arranging my pieces on the kiln, I chatted with an artist named Jordan who works at the studio. His specialty is neon. He explained that each neon beer sign -- like those famous Budweiser signs -- is handmade. After, I took a look around the neon studio and was amazed to see such complex pieces. I never thought of neon as an art form. I'll get some pics for you next week.

I was just happy to finish my set of coasters. Here is how they turned out:

The dark green glass ended up being shiny -- and a black ring formed around the edges. My teacher said that some colors will "ghost" like that when they melt. It was unexpected, but looks really cool.

This class is only six sessions long, but I want to see if I can continue with this skill. I'd love to incorporate wire work, enameling and glass fusion into my pieces.

Check out the rest of my jewellery at Naomi's Designs and MayaGirl Creations.

Sunday, January 24, 2016

Adventures in handmade jewelry: making fused glass jewelry


Oops, I see it's been over a month since I've posted. Sorry about that! Hope you all had a great holiday season. Happy New Year!

So far, 2016 is off to a good start for my jewelry making career. I began a new class last week: fused glass at Brooklyn Glass.

I really like glass jewelry and have always been intrigued with glass art. My dad took a stained glass class when I was a kid and I would sometimes go with him. Though I never actually went with him into the studio, I enjoyed looking at the art made by the teachers and other students.

I've also purchased many fused glass pendants from craft fairs. Whenever we go to a fair, I like to buy something from a fellow jewelry artist so I can show my support -- and my eye is usually drawn to beautiful glass. I think this is why I fell in love with enameling. I wished I could make some fused glass jewelry, as well.

Unfortunately, the Y doesn't offer any classes in fused glass so I had to look elsewhere. I turned to Brooklyn Glass, a studio located about an hour from us. My husband and I went there about a year-and-a-half ago to see a strange "performance" of Medea involving puppets and glass blowing. We were invited to this thing by my good friend Amy. I can't say that the performance was great, but we enjoyed watching the artists make glass vases and bowls in the kiln.

Jon really wants to take a glass blowing class. I still need to sign us up, but that honestly doesn't interest me too much. I think it'll be fun to try it out, but that skill takes a lot of strength and patience, plus it requires one to spend a lot of time in front of a hot oven. I was more interested in the studio classes, like glass fusion, so I signed on for that.

I was a bit nervous to start this class because I was afraid I wouldn't like it. After all, I really didn't like the painting class I took last year. I hoped this would turn out to be something I could stick with.

Happily, I had a great time and the three hours flew by. Though I've just started, I'm already designing pieces in my head and can't wait to make them a reality.

For the first class, our teacher showed us how to cut and shape glass. Enamel involves firing powdered glass onto metal, but with fused glass, you well, fuse sheets of glass together. It's kind of like enameling on steroids. There are some similarities: the glasses have to be compatible, meaning they melt at the same rate, whereas in enameling, the glass and metal have to be compatible. However, it takes about a minute to fire an enameled piece, whereas it can take TWO DAYS to fuse glass.

I'd watched some videos on glass cutting, but it wasn't as easy as it looked on YouTube. The glass scoring tool is sharp, but you have to put a lot of pressure on it to make a dent in the material. Once you score the glass, it does cut pretty easily, but I also cut myself a few times. Those shards are so fine that they slip right into the skin like splinters. At one point, I hadn't even realized I'd cut myself, but then I began to bleed. This is why my teacher keeps a box of Band-Aids on the table. I've also burned myself while enameling. I figure it's a right of passage...

Our first assignment was to practice cutting shapes and to then create coasters with identical designs. I ended up making three! What's funny is that my other classmates went for big, bold patterns, while I cut tiny, intricate shapes. I'm so used to thinking "small" for my jewelry. My teacher said I can make earrings this week, so we'll see what happens.

Here are some shots of my coasters, as well as my classmates' in the kiln. I can't wait to see how everyone's pieces turn out!

Meantime, check out my handmade wire wrapped and enamel jewellery at Naomi's Designs and MayaGirl Creations -- and follow me on Instagram at Naomidoesjewelry.