Monday, July 31, 2017

Tales from the craft fair: selling at Bushwick Vendors Market


This year, I've done more vending at craft fairs than I have in all of my other years of making jewelry combined. Though I've mainly sold at Ridgewood Market's monthly event, I've been experimenting with different venues. This weekend, I sold at the Bushwick Vendors Market, which was an interesting experience, to say the least.

Bushwick, Brooklyn is about a mile up from Ridgewood, which is right on the Queens/BK border. Both neighborhoods have reputations for being funky and artsy, and are the perfect places for hosting craft fairs. I figured that the BVM would be a similar type of event to Ridgewood, where local artists showcase and sell their work. I was wrong.

The event was advertised as a night market which would feature music, art and crafts. I figured it would be a fair that included some live bands. Instead, it was an immersive music/art/jam session... that just happened to have a few vendors present. Though the host was Brooklyn VENDORS Market, the vendors seemed to be an afterthought.

I really liked the space where the event was held: The Silent Barn. It's an open hall, which has an area for bands or parties, and there's a bar and backyard garden. Since it was such a beautiful night, I set up my table outside -- and was surrounded by fun and colorful graffiti art.

At first, I thought I'd be the only vendor present, but eventually four other sellers arrived. One couple sold postcards, another T-shirts, and a couple of women sold home goods. Like I said, though, these booths were an afterthought. Instead, most of the participants came to paint, drink and hang out.

This particular crowd was very, VERY young; I'm guessing that most of the people there were in their early 20s -- just old enough to drink. I'm 43 and Jon is 45... and while I consider myself to be "young at heart," this crowd made me feel ancient, lol! Jon was very amused when the bartender carded him. I explained that he was probably told to card everyone... and just wasn't expecting a geezer to show up. I thought I was on top of pop culture trends, but I didn't recognize any of the music played and the fashions weren't any I'd seen before. Apparently, I'm quite out of the loop...

There was a group of actual kids who arrived, probably around age 11-12 or so. Maybe they were with a summer camp? I'm not sure. They came early and engaged in the free painting that was offered. They did notice my table, though, and crowded around to admire my jewelry. "Do we have to pay for these?" asked a boy. I explained that yes, they're for sale and a girl sighed loudly. "They're all so pretty. I wish they were free!" Sorry, kids! I'm happy they liked my work. They had a great time painting and I enjoyed watching them express themselves through their art.

As the night went on, more young adults arrived. Many stopped by to check out my work, but the problem with selling to a younger crowd is that many just don't have cash. I can certainly understand this. Chances are, they're paying off college loans or have just started renting a place, or are at a new job. At this point, I accepted that I wouldn't be making any sales, but still wanted to see what the evening had in store.

To my surprise, I actually made a few sales. One was to another jewelry vendor, who'd arrived late. She's a fellow cat lover and purchased one of my cat rings. She was very sweet and gave me a hug after buying her jewelry. Of course, we showed each other photos of our kitties.

Around 10 p.m., the event host announced that it was time for some entertainment. I expected to hear some live music, but instead, everyone engaged in an open mic session. The host encouraged people to express themselves through poetry, music, rap, etc. A few people took the mic and recited poems or sang songs. Meanwhile, others continued to paint and the space filled up with the art. The host explained that they'd succeeded in making the space a diverse and integrated one, welcoming people from all backgrounds and race. Indeed, it was a diverse crowd, which is one of the things I love about New York City.

I have to say that everyone was extremely polite and encouraging to those who went up to speak or sing. Some shared some very personal stories, but the crowd applauded loudly and cheered them on. I really enjoyed seeing the next generation engage in art, literature and music.

In the end, I took a loss since my sales didn't make up for the registration fee. This obviously wasn't the vending event I'd expected and I didn't quite fit in. Still, I'm glad I attended the festival and am happy that my money went toward a great cause. I'm all for promoting the arts, especially to younger folk -- and I love that there's a free space where 20somethings can share their work.

Check out the rest of my handmade jewelry at Naomi's Designs and MayaGirl Creations.

Saturday, July 15, 2017

Creating multilayered fused glass dichroic pendants with patterned and clear glass


I've written several posts about my attempts to make multilayered dichroic glass pieces. Many of these attempts have failed because the glass broke or didn't fuse correctly, but I'm finally getting the hang of it! I'm now creating pendants that have four, five, six... and even seven layers of glass.

Lately, I've been experimenting with clear dichroic glass. I haven't worked much with this material, but the clear glass is great for fusing onto colored base glass or for creating layers. It has patterns and textures just like the dichroic glass on black, but is transparent. Therefore, when you fuse patterned clear glass on top of patterned opaque glass, you get a combo of those designs.

The trick to layering glass is to make sure each layer is even. I always start with a piece of base glass -- generally clear, black or white -- and then top it with opaque dichroics on black. However, I make sure that all of the dichros are the same thickness. This way, the next layer of glass will lay flat across. If you add a piece of say, Wissmach textured glass, which is lumpier than most other dichros, it'll be harder to get an even fuse. I like to use a dab of Krazy Glue to keep my pieces in place. The glue keeps the glass still for working purposes, but eventually burns off in the kiln.

Next, I add a few small clear pieces, choosing ones that have interesting tints and patterns. I then top it with a piece of clear base ... and then this is where the fun begins: I add a couple more layers of clear glass, again mixing up tints and patterns.

So far, seven is my record; that large blue piece that's at the top of this post is my seven-layer one. I didn't like how it turned out when I first took it from the kiln, but fell in love with it after it cooled and hardened. It reminds me of an ocean scene and I really like the color combinations.

I've found that if you pile the pieces on too high, the colors will become muddled and the glass will lose its shape. Basically, it's a bit like building a pyramid; I use more glass on the bottom and then use fewer -- and smaller -- pieces as I build up.

To heat such thick pieces, you need the larger microwave kiln. I do an initial firing for 9 minutes, then do 1 1/2-minute intervals. There's no way that these items would hold up in the small kiln; they'd probably break after about a minute of heating. Low and slow is the way to go!

I'm glad I'm paying more attention to the clear dichros because I'm going to be having my students work with colored base glass -- and I plan to show them how to fuse them with clears. I think they're really going to enjoy this lesson. I'm certainly enjoying my glass experiments.

Check out the rest of my handmade jewelry at Naomi's Designs and MayaGirl Creations.

Wednesday, July 12, 2017

Adventures in teaching:making handmade etched dichroic glass pendants


My latest class at Maple Grove Cemetery was my most exciting yet! I had my students design glass pendants using Armour Etch Cream.

I was a bit nervous about actually hosting this class because the etching cream is extremely potent. After all, it's made to dissolve the outer coating on dichroic glass. You can get injured if it comes in contact with your skin or you breathe it in, so I had my students "suit up" with protective gloves, surgical masks and goggles.

This time, the class was so full, we occupied every seat in the conference room. Several attendees came from neighboring towns, which was really nice. Maple Grove is quickly gaining a reputation for its arts and cultural programs.

I did a demo and showed the students how to apply the etching cream. Because this stuff acts immediately, I like to lay down a very light layer to map out my design. After that, I gently dab a couple of coats onto the lines. The trick is to apply a thick coat of cream, but to not goop it onto the glass. I use thin brushes so I can keep the lines as fine as possible.

One woman hadn't realized exactly WHAT we'd be doing and was nervous about using the cream. Still, she gave it a shot. She was reluctant to add too much and her designs came out too light, but she had a great sense of humor about it and joked that hers were the "ugly pieces." I disagree! She need practice, but well, that's what the class is for -- and her pieces really weren't bad.

A couple of other students caught on right away and came up with amazing designs. I'm so proud of them!

Unfortunately, I screwed up in a big way. One of the most important things to keep in mind when fusing glass is that you need to give it time to anneal and harden. If you bake, you know that the cake needs to cool before you add icing or else the icing will melt over the top. Cooling glass too quickly leads to it breaking.

I'd warned the students ahead of time that I might have to fire some pieces at home, but I still got a lot of, "Is my piece done? Is it cool?" I really should've stood my ground and said, "No. It takes about a half hour." However, I wanted to please everyone and rushed the process. I stuck a few pieces under cold water to speed up the cooling ... and they all snapped in half. I'm so angry with myself.

Meantime, I'd put the hot lid down on a towel... and it burned a hole right through the cloth. Have you ever smelled burnt terrycloth? YUCK! A clump of black goop was left behind. It was so disgusting.

Fortunately, the students were understanding. The "Ugly Piece" woman burst into giggles. The others simply shrugged and glued their pieces back together. They were really nice about it.

The hosts, Helen and Carl, also forgave me for ruining their towel. "It's from the dollar store," Helen noted. Whew! I totally blame myself for these mistakes. As a teacher, it's up to me to stay in control and concentrate, and to keep everyone safe. I can't get flustered, even when the session is hectic. I'm still learning myself.

Happily, everyone had a great time. Several people told me how much fun they'd had and asked when I'll be having my next class. Since etching went so well, I'd like to try it again with stencils. This way, my students can create more complex designs.

Most people chuckle when I tell them I teach at a cemetery, but I'm so grateful to Helen and Carl for giving me this opportunity. I'm so proud to be a part of Maple Grove's programs.

Check out the rest of my work at Naomi's Designs and MayaGirl Creations.

Monday, July 10, 2017

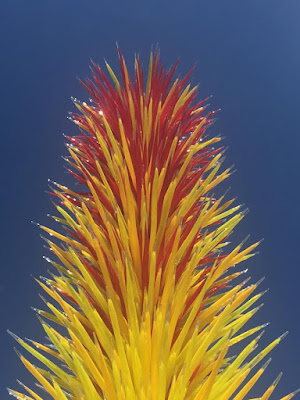
Inspiration for making handmade glass jewelry: visiting the Chihuly exhibit at New York Botanical Garden


When it comes to making glass pieces, I'm still fairly new to the discipline. After all, I've only been doing this for about a year-and-a-half. I'm skilled, but hardly an expert. I'm always looking for inspiration from artists who really are experts -- and none has been more inspirational to me than Dale Chihuly.

Yesterday, my husband and I spent the day at the New York Botanical Garden , which is currently featuring a few dozen Chihuly glass sculptures. His medium is blown glass and if you're not familiar with his work, take a look at these gorgeous creations:

He's been working professionally with glass since the 1960s and his art has been displayed in parks and gardens throughout the world. We're fortunate to have him in NYC through October -- so if you're in town, definitely go to the exhibit.

Much of his work is inspired by nature, especially the sea. This is evident in many of his whimsical pieces, which resemble shells, seaweed or coral. What's really amazing about his sculptures is how well they blend into the real plant life. In some cases, it was difficult to tell which was real and which was glass.

The exhibit itself is present throughout most of the garden -- which is enormous. Jon and I covered over six miles walking around it! That said, it feels almost like you're on a scavenger hunt as you wander from section to section, searching for Chihulys. We could usually spot them by the huge crowds that gather around the pieces.

It was difficult choosing a favorite, but I think I'll have to go with those first three that are pictured in this post. I especially like that blue sculpture, which is appropriately named "Sapphire Star." It's simpler than his other pieces, but I love the vibrant colors.

When you get up close to these sculptures, you can see the details he puts into his work. For instance, his iceberg piece has actual cracks in the ice. Meanwhile, his glass "leaves" have the various shades of green that you'd see in a real plant. I know a tiny bit about glass blowing because they teach it at Brooklyn Glass, but I didn't realize you can add so much detail.

Jon would like to take a glass blowing class; meantime, I plan to show my photos to my students so they can see just what can be done with glass. His work has inspired me to be a bit more experimental and I hope it encourages them to be bold when coming up with their designs.

I'm no Chihuly, but you can still check out my jewelry at Naomi's Designs and MayaGirl Creations.

Friday, July 7, 2017

Teaching handmade jewelry: my new teaching job!


Last week, I began an exciting new job: teaching fused glass at the Atria Senior Residence right near me. The Engage Life Director has titled it "Naomi's Jewels." Snazzy, right?

I've been playing flute there for two years and have done a couple of jewelry sales for the seniors, but the Atria was looking for some "different" programs to be included in the lineup. Glass jewelry fit that description! My class is being held once a month, which is perfect for my freelancing lifestyle. It's being held often enough that I can count on a paycheck, but is still rare enough to be special. Since I now teach at three places, I can rotate and devote time to each venue.

What's nice is that I already know most of the staff and residents so I'm not the "new girl." My close friend Judith is assisting me, so we're getting to do something together outside of music. My first class also happened to be held on the first day of the newest Engage Life staffer, so she helped out, as well. She's young and enthusiastic, and has an art background, so she was perfect.

The class is being held in Cafe Atria, which is a small kitchen area with tables and chairs, a toaster and microwave. It's adjacent to the front hallway, so it's open and bright, and people are constantly walking by. I like this set-up because it's much more comfortable than being crammed into a back room.

10 seniors showed up for my class, including two men! I rarely get male students, so I was delighted to see them there. One planned to make a pendant for his daughter, while the other just wanted to try something new.

I kicked off with my easiest project: making mosaic pendants. This is great first lesson because it lets my students play with the different types of dichroic glass. I cut about a hundred small pieces for them, giving them access to glass in many colors, textures and patterns.

The biggest challenge that comes from working with this group is that several have memory problems. I had to be extra-careful to keep them safe. I filed and blunted the ends of every single glass piece and constantly reminded them to not go near the hot kiln. I also assured them that if they needed help, they shouldn't be shy about asking. Some were able to assemble their pieces without assistance, but many did need help. They told us where to place the glass so they did have a hand in constructing their pendants. The idea behind these programs is to not only do something fun, but to keep their minds active. I'm so proud of the designs they came up with.

All of these students are in their 80s and 90s, but none have ever worked with glass. They were so enthusiastic and enjoyed learning something new -- even at their advanced ages. As one said, "It's never too late to try something different." I love that attitude!

Since I live so close, I fired the pieces at home and returned with them a few days later. The best part was watching the seniors open the envelopes with their jewelry. They were so pleased! Here are a few, showing off their work:

I returned to the Atria on Tuesday to do an impromptu Fourth Of July program with Judith. We played patriotic songs on flute -- and kazoo! -- and wandered all over the building. Many of my students were wearing their pendants and stopped me to say how much they loved my class. As cheesy as it is to say this, that meant so much more to me than the money (though I appreciate that, too!).

I've come up with a long list of projects and am so looking forward to this month's lesson. I never expected my music to take me in such an unusual direction, but I'm glad it did.

Check out my jewelry at Naomi's Designs and MayaGirl Creations.

Thursday, July 6, 2017

Making handmade jewelry: silver wire wrapped bracelet with pink dichroic glass heart charms and crystals


Hello, readers! I know, I've been MIA, but that's because I've been busy creating... and teaching. I recently started a glass class at a third location: the Atria Senior Residence. I've volunteered as a musician there for the past two years, but they were looking to hire some people for "different" kinds of programs. No one had ever taught a glass-making class, so I was their pick!

I'll write more on that later, but for now, I'd like to share some photos of my latest custom-designed item: this Queen Of Hearts bracelet, made with silver plated wire, crystals and three pink dichroic glass heart charms.

This bracelet actually developed from me making a ring. This week, a friend is in Vegas renewing vows -- with Elvis officiating! -- with her hubby of seven years. She asked if I'd design a ring for the event. When I asked her what she was looking for, she replied. "Anything you want. Something fun and cool." I told her I needed more information and showed her some photos of my rings. She fell in love with the ones made with dichroic glass and liked the idea of featuring a heart. She also requested that I use her favorite color, pink.

Since she didn't have a clear idea of a design, I made four versions of the ring, using pink and hot pink glass. Each had a different heart decal fired onto the surface. She ultimately chose a plain pink ring with a simple heart. Unfortunately -- or fortunately for her, anyway -- she lost a few pounds between the time I made the ring and the time she left for her trip, so my piece ended up being too big for her traditional ring finger. She's been wearing it on her thumb, which is a little odd for a wedding ring, but as she said, "It's fine for Vegas."

She felt badly for only choosing one of my four patterns, but I assured her that all of the pieces would be used. I decided to turn them into this fun and colorful wire wrapped bracelet. I'd originally planned to use one shade of pink crystals, but went with a bunch of different pinks, as well as some purple and lavender.

I'm hoping that my friend will allow me to share some photos of her ring. More importantly, I hope she's having an amazing time in Vegas!

Check out the rest of my jewelry at Naomi's Designs and MayaGirl Creations.