Tuesday, March 28, 2017

Adventures in teaching how to make handmade jewelry: making handmade glass earrings at Maple Grove Cemetery


What a great weekend I had ... spent at the cemetery! I've been teaching at Maple Grove for a few months now, but I still get a kick out of saying that.

The weekend began with a 1950s-style tea party, which was held in Maple Grove's main reception hall. I didn't wear a costume (that's me in the black top with the roses), but many of the attendees dressed up in vintage outfits. Some borrowed their mother's clothing or donned outfits that they'd worn back in the day. The woman at my table who is holding up the plate of treats even wore a poodle skirt and an "I Like Ike" pin. She and the other people at my table decided that in my all-black ensemble I could be a beatnik.

I didn't really know anyone there other than the organizers, so I was a little nervous when I entered the hall. Happily, everyone was very friendly and I had a great time chatting with my table mates. When I mentioned that I teach jewelry there, they were like, "Oh, you're the jewelry lady!" I then ran into a couple of my students who'd forgotten my name and they also referred to me as "The jewelry lady." So I guess that's my new nickname: Jewelry Lady.

I expected to be served some tea and sandwiches, but we were presented with a feast -- most of it made by our organizers Helen, Carl and Celeste. There were, of course, tea sandwiches, as well as cupcakes, muffins, mini tarts, cheese cubes, fresh fruit, little cakes. Everything was delicious and I ate way too much.

We also enjoyed a quartet and singers who performed '50s songs, as well as a history lecture about Volney Chapin Daggett, who is buried in Maple Grove. He perfected cold cream so that it wouldn't turn rancid and had a longer shelf life. He was also the founder of Daggett And Ramsdell, a cosmetic company that still exists.

On Sunday, after I'd recovered from the festivities, I returned to the cemetery so I could teach a class on making fused glass earrings. The group was smaller than usual, but this gave me the chance to teach my students some more advantage glass fusion techniques. One student has been to all of my classes so far and has been dying to make a triple layer piece. I hadn't been able to let her because those pieces take longer to fire and with so many students, kiln time is precious. I was finally able to give her to go-ahead and she was ecstatic.

Though I pre-cut pieces for everyone, I like to give my students a chance to score and cut their own glass. I was pleased to see that this woman was able to successfully cut pieces without any help. She's been paying attention! Her earrings turned out beautifully and she was really pleased. A couple of students even had time to make pendants.

While we waited for the glass to cool, I showed everyone some basic wire wrapping techniques and had them practice making round and square spiral shapes. "It's so much harder than it looks!" said one woman. The above-mentioned regular admitted that the wire frustrates her and she much prefers working with the glass. I understand because soldering was frustrating for me, but I took to enameling right away. I guess certain types of jewelry techniques "speak" to people while others don't. She said that creating glass pieces is "addicting," which makes me so happy. I love working with glass and am thrilled to know that others appreciate this art form.

While we finished our pieces, we chatted and munched on leftovers from the tea party. Technically I was working, but this didn't feel like it at all. It was more like I was hanging out and making crafts with friends. Having large groups of students is fun, but I really enjoyed getting to know the others in this intimate group. Some say that you should aim to find a way to get paid doing the thing you love. That's exactly what I'm doing and this cemetery class is one of the best "jobs" I've ever had.

Check out my handmade jewelry at Naomi's Designs and MayaGirl Creations.

Monday, March 20, 2017

Adventures in making handmade fused dichroic glass jewelry: the great glue debacle of 2017!


I always try to take safety precautions when making jewelry... but sometimes, well, shit happens. Take my recent mishap, which I call the "Great Glue Debacle Of 2017."

When making wire wrapped jewelry, I never solder the pieces together: they're all attached with handmade findings and jumprings. However, I can't put metal in my microwave kiln so I simply glue my findings onto my glass pieces. I simply use Krazy Glue -- nothing expensive; nothing special -- and it does the trick. A little bit goes a long way and keeps my necklace and earring hooks, etc. intact.

Gluing my backings is usually the easiest part of the process; I squirt on some glue, attach the backing, let it sit. No sweat, right? Theoretically. Unfortunately, everything went pear-shaped this weekend and I ended up with a big mess.

I'd purchased a brand new tube of glue and gently squeezed it, intending on squirting out just a small dab. This tube was defective, though, because a giant wad of glue spilled out. It got all over the pendant, all over the table ... and all over me. I quickly went to clean it, but my stick hand attracted another pendant and a ring that were drying... and now glue was on these pieces. Ugh!

I keep a bottle of nail polish remover on hand for these situations, so I polished off as much of the jewelry as I could. Then when they dried, I gently peeled off the rest of the glue. But this stuff would not come off my fingers. I dipped them in the acetone, rinsed them in warm water and soap... nothing. So much had gotten onto me, it just stubbornly sat there.

People often ask if it hurts to get such strong glue stuck to your skin and no, it doesn't. It's just annoying. It gets in the way when you're trying to do something that requires precise finger coordination... like, in my case, play the flute. It doesn't hurt or burn, though. I do tell my students to rinse it off immediately so there's less chance of it sticking. I just spilled so much onto myself that some stayed.

The glue is finally peeling off today and my fingers are getting back to normal. I try not to get too upset over these things; really, all I can do is roll my eyes and laugh at myself. I mean, hey, Julia Child made a whole career for herself by showing off her cooking mishaps!

I've always been a perfectionist, but have gotten more relaxed about making mistakes in recent years. Being a jewelry designer has definitely gotten me to loosen up because you just can't expect perfection on the first run. It's all about trial and error, and practicing -- and part of the fun of it is in learning new techniques. I enjoy playing "Mad Scientist," even it means spilling glue on myself every so often.

I like to tell my students that there isn't a wrong way to do something; that it's just one more step to doing things the right way. I'm trying to take my own advice.

Check out the rest of my handmade fused dichroic glass, wire wrapped and enamel jewelry at Naomi's Designs and MayaGirl Creations.

Sunday, March 19, 2017

Handmade fused dichroic glass jewelry: hand etching glass with etching cream!


I got a new, fun "toy" to add to my arsenal of glass-fusing supplies: etching cream!

I've been wanting to etch my own designs for a while and finally got around to actually purchasing the cream. I use a brand called Armour Etch, which you can order online or buy at most craft stores for about $8-10 US. The bottle I got is small, but a little goes a long way. This stuff is AMAZING.

Whenever I etch metal for champleve enamel pieces, I have to soak the copper in ferric chloride for at least three hours. With etching cream, it takes about five minutes for a design to appear. Basically, you apply the cream to any area of the pre-fired dichroic glass you want etched -- and it works best on glass with a coating like dichroic -- let it sit for a few minutes, rinse and then voila! You have an etching.

An important warning: this stuff is potent! When working with it, you should wear rubber gloves, safety goggles and a surgical mask. I also opened a window. You do not want to breathe this stuff in. It's strong enough to corrode glass in a matter of minutes. It will definitely burn your skin -- and your nose hairs.

Once I suited up, I got to work. Using my thinnest paint brush, I attempted to etch a design... and it turns out, the cream is a bit goopier than I thought it would be. It took a while to get used to working with it, so my early designs are a mess. I also learned that you need to apply at least two coats to each area because I had to re-do a few designs that hadn't etched properly.

Now that I've gotten the hang of using it, I'm having a blast. As you can see from my photos, I've experimented with making abstract designs and with using negative space to frame objects like the cat or hearts. I had to go over the black areas with cream a few times to fully strip the dichroic coating. Now I know that it'll take at least two applications to get the black nice and shiny.

My designs were all drawn free-hand, but you can also use stencils or transfer an image onto the glass to then etch. I applied a very light layer of cream just to outline my designs and then went over the lines with the rest of the cream. Stencils are fun, but since my desire to etch is so I can use my own patterns, I'd rather do them free-hand. Besides, I'm already working with decals and pre-made laser-etched glass. Now I have many different options.

I've seen some incredible etched pieces on Pinterest. Some artists have created landscapes or have etched intricate mandalas. Meanwhile, I'm happy that I managed to successfully paint the cat. I'm really enjoying the work, though, and have so many more ideas. Between my etching, decals and wire wrapping, I have plenty to keep me busy.

Check out the rest of my handmade wire wrapped, fused glass and enamel jewelry at Naomi's Designs and MayaGirl Creations.

Thursday, March 16, 2017

Making fused glass jewelry: pendant FAILS!


I usually use this blog to show off and advertise my successful handmade jewelry projects, but actually getting to that point where I have something boast-worthy takes a lot of work! I've also had many failures along the way and I think it's important to show those, too. This is going to sound cheesy and cliche, but I don't get too frustrated when I mess up a project because it really is a learning experience. I figure out what went wrong, correct the problem -- and then try not to repeat it.

Take these "layered" dichroic pendants, for example. They're real beauties, right? Not.

When making them, I was attempting to use transparent dichros so I could add depth to my layers. It took me a long time to figure out how to even make triple-layered pendants, but now that I'm regularly doing that, I'd like to add something more. The idea was to slip thin transparents between the main layers so I could add some shading and texture. Instead, I went overboard and got ... well, a mess.

I like what I did with the base colors. I usually use black, white or clear glass for my base, but here I used two different dichros UNDER a layer of clear. This gave the base a super-shiny texture and I had a lot to build from.

However, this is where I went wrong. I piled on too many pieces of glass and didn't really think about which colors would work best with the base. Basically, I was experimenting to see how certain combos would turn out. But I should have gone lighter on the glass and definitely shouldn't have added those solid colors on top.

My worst mistake, though, was placing the small piece of rainbow glass in the top center of the pieces. There was too much glass in the way for it to fire properly and it turned into a messy blob.

I haven't given up on layering. There's only so much I can do with my microwave kilns, but I'll keep practicing until I figure out which tricks work! I've made a lot of mistakes, but wouldn't have gotten anything done if I'd given up.

Check out the rest of my handmade fused dichroic glass, wire wrapped and enamel jewelry at Naomi's Designs and MayaGirl Creations.

Tuesday, March 14, 2017

Photo gallery: handmade fused dichroic pendants with decals


It's about six weeks 'til the Readers studio tarot convention and I'm getting excited and nervous! I always hope that people at fairs like my work, but in this case, I'm going to be vending for four very long days. It's going to be intense, especially since I've never really been to a convention before. I did spend one afternoon at a writers' convention, but didn't stay for the entire weekend. This will be a much more thorough experience.

My friend Judith keeps telling me how awesome this event is and how much fun we'll have. Since she's one of most fun people I know, I have to believe her, right? I'm looking forward to meeting some fascinating folks and making new friends. I'll also, of course, learn everything there is to know -- well, not quite -- about tarot.

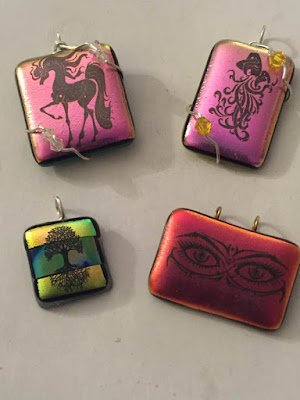
Today was a snowy day in NY, so I spent it making fused dichroic glass pendants with decals. Here is a photo gallery featuring some of the pieces I've created for the upcoming Readers Studio weekend. You can see the rest of my work at Naomi's Designs and MayaGirl Creations.

Thursday, March 9, 2017

Making fused dichroic glass jewelry with decals: mystical pendants


So far, April is shaping up to be a crazy, busy month! On April 9, Jon and I will be celebrating our 17th anniversary. 17 years!!! Where did the time go?! There is also Passover, our niece's birthday ... and craft fairs galore. I've been invited to Ridgewood Market's next event on April 22. Then, from April 27-30, I'll be selling Naomi's Designs at the Readers Studio Merchant Faire. Whew!

I wasn't sure if I should sign up for Ridgewood next month because it's so close to the tarot convention, but Scott said to me, "Naomi, it's your JOB." He's right. I'm spoiled because I'm so used to working in the comfort of my home, but I should take the opportunity to sell at events if space is offered to me -- especially if it's a fair where I've done well. I enjoyed my experience at Ridgewood, so why not? Jon can sample more beers and I'll finally try one of the giant pretzels they sell there.

Since I have over a month to prepare, I'm making several new pieces each day. My plan is to fill another 36-slot ring box since I sold several of those last time. I'm making more wire pieces. I also plan to sell the $5 wire pendants I'd made for my sales at the senior homes. I figure the bigger the range of merchandise and prices, the better chance I have of getting customers.

I'll only have 3-feet of table space at the tarot convention, but I'm going to fill it with pieces that reflect the theme. I know next to nothing about tarot, but I did go to a salon which was hosted by the Readers Studio founders. I learned the basics and got some ideas for jewelry that the attendees would like. Using glass decals, I'm creating mystical-inspired pendants that are colorful and fun:

Out of this batch, my favorite is the red All-Seeing Eyes pendant. It's just so creepy and cool. Those eyes came with a set of decals I ordered that feature dragons, unicorns and Zodiac symbols. When I saw those eyes (no pun intended), I knew I had to make something with them.

The opportunity came up when I played around with different colored base glass. I usually use black, clear or white base glass, but after making so many items, I ran out. I was left with blue, green and red and wanted to see what happened if I mixed certain colors. When I use neutral bases, the solid dichroic "Candy Apple Red" turns orange... but when I fused it onto a red base, it turned blood red. I loved the shade and the pendant shape happened to be perfect for those eyes, so I added them on.

I'm not sure what they are. At first, I thought they were Eyes Of Buddha, but they don't match the other images I looked up. I guess they're just supposed to be all-seeing, all-knowing eyes.

I felt like the unicorn and Aquarius symbol needed some embellishment, so I added crystals, but the eyes work well on their own. Simple and ... eye-catching (pun intended this time!).

Check out the rest of my jewelry at Naomi's Designs and Mayagirl Creations.

Sunday, March 5, 2017

How to make fused glass in a microwave kiln: large versus small kilns for making glass jewelry


When I was at the craft fair yesterday, many customers were intrigued to hear that I make my glass jewelry with a microwave kiln. A few wanted more details and wondered which is better: a large or small kiln? After working with dichroic glass for a year, I'd say that both are useful for different reasons. Here are some pros and cons for each.

SMALLER MICROWAVE KILNS: I think these are perfect for beginners. These kilns become hot at 1500 degrees F and the smaller ones are less cumbersome to handle. So as you're getting used to opening and closing the lid, checking on the piece, etc., I'd recommend starting with the small one. They're also less expensive, so why spend the money until you know you truly enjoy making glass?

As an intermediate glass maker (I refuse to call myself a "professional" at this point), I prefer using the small kiln for fine detail work. Because it heats quickly, I find that it's good for firing pieces at a particular stage or for adding decals. The small kilns heats within a few seconds, so I can heat items in 10, 15-second increments and then stop the process at the exact moment I want. This is especially effective when I want to purposely underfire an item or play up a particular glass texture.

Having it heat quickly is great when you're an impatient person like me, but large glass pieces tend to break when they gain too much heat at once. I've learned to deal with this by slowing down the heating process, but it's frustrating when your glass cracks right down the middle.

LARGER MICROWAVE KILN: The big kiln is bulkier and more difficult to handle. When I need to bring it to class, it's a pain fitting it into my bag. It also take about 8-10 minutes (depending on the microwave) for it to even begin heating.

Still, there are many advantages to using a large kiln. For one thing, it holds more pieces, which is especially helpful when I'm teaching. Because it heats more slowly, large pieces fire more evenly. I can stick a big piece into the large kiln, set the timer for 8 minutes and not have to worry about cracking. Even better, the slow heating time helps smooth out jagged edges, so glass that was cut on an angle ends up lining up with the rest of the piece.

The large kiln works best for larger pieces, however. When I've heated a batch of smaller ones, not all of the pieces have fired at the same rate and I've had to re-do them. Not does the big kiln work well for decals, which tend to come out over or under-fired. Of course, it's also more expensive.

Overall, I'm happy with both of my kilns and am getting better at using each for different techniques. Mostly, I love the fact that I can make beautiful pieces in my apartment -- and that the kilns are portable, which allows me to teach in different places.

Whether you get a large or small kiln, you'll enjoy your foray into glass making. Of course, wear gloves, protective goggles and always, ALWAYS put safety first!

Check out my handmade glass, enamel and wire wrapped jewelry at my WEBSITE/STORE or Naomi's Designs and MayaGirl Creations.

Tales from the craft fair: Ridgewood Market Night Bazaar


Last night, I sold my jewelry at a unique and fun location: Ridgewood Market, located in Ridgewood Queens. This was the first evening market I've worked at and I had a great time!

This market is four years old, but I didn't hear about it until last year when my friend, Susan, suggested I sell at it. She lives in the area and I always enjoy visiting the neighborhood, which is about four miles from mine and borders Brooklyn. Ridgewood has many funky shops and an artsy vibe -- and this eclectic fair, which is held once a month at Gottscheer Beer Hall, fits right in.

Our evening kicked off with a bit of adventure when our friends, Rachel and Henry, offered to drive us over. We ended up at another beer hall in the neighborhood -- that also doubles as a spot for craft fairs. Who knew? Thankfully, we were close to Gottscheer Hall, so we had a good laugh and arrived with plenty of time. Meanwhile, we took the scenic route around Ridgewood, which is known for its historic row houses.

Ridgewood Market is juried so there were some interesting vendors present. One woman sold honey, all of which is produced in Queens, NY. You can order the honey by zip code. Apparently, NYC has a bee keeping scene, with people keeping hives in their yards, roofs or public gardens. Very cool! Another woman sold zombie-inspired accessories... and one man sold animal parts in jars. Definitely NOT my thing, but his booth stood out!

Many of the vendors also sported memorable looks. About half of the participants had blue or green or pink hair, and multiple piercings. One man donned about 50 chains and a top hat. I felt a little underdressed with my plain, black outfit and brown hair, but I don't think I could pull off a pink 'do.

Here are a few shots of my booth. No animal parts present...

I was seated across from sisters who baked the most delicious and beautiful pastries. This was dangerous for me because I wanted to eat 'em all! I settled on purchasing ONE chocolate chip cookie and enjoyed every bite. Next time, I'll request to be placed across from the zombie lady...

Our friends, Scott and Christopher, were there, representing Lewis Oliver Farm Sanctuary. They're trying to raise $600 so Annabelle the cow can get her hooves fixed. They sold a variety of items, including stuffed chicken toys and Christopher's yummy vegan cookies. All of the proceeds went toward Annabelle's manicure. Scott explained that as great as it was to get donations, they were simply happy to tell people about the sanctuary. Still, I was pleased to see that their items were selling well and that people were being generous. One person purchased two chicken dolls and then took them into the bar, where he made them dance. The guys had a good laugh when the person's friend showed them the film he'd made of the dancing chickens.

Our other friends, Nancy and John, planned to surprise me with their appearance, but Scott blabbed and told me they'd be showing up. Oops. We still had fun hanging out. My Jon enjoyed sampling beers from the bar, while Scott splurged and had a giant pretzel. Seriously, these pretzels were the size of a person's head!

Though I didn't sell as many items as I had at the Kew Gardens Art Fair, I still did pretty well. Customers really liked my glass rings and were intrigued when I explained that I fire my glass in a microwave kiln. "You should tell them you make it in your STUDIO," Nancy advised. I argued that people are more surprised to hear that I create my work in a microwave. Sure enough, I got a lot of questions about my method. It was a good conversation starter and kept people at my booth where they'd take a longer look at my jewelry.

At one point, a little girl -- about 5 or 6 -- arrived at my booth with her mom and asked if she could try on a necklace. I helped her put it on and she admired her reflection in my mirror. She then tried on a bunch of rings as she made faces and struck poses, all while staring at herself. Her mom finally dragged her away and she walked off with my mirror. Jon had to chase after her to get it back.

The guys befriended a 10-year-old boy, who lives in the neighborhood and comes to the market every month with his dad. He was already a fan of the giant pretzels and wore a "Got Pretzels?" T-shirt. He kept returning to the guys' booth and serenaded us with his rendition of "New York, New York."

One thing that surprised me was that people are still interested in my wire wrapped pieces. I've gotten a lot of attention for my glass work and have made that the focus of my business, but many do like the wire jewelry. I actually sold two pairs of wire chandelier earrings, both of which I've had in stock for YEARS. I almost didn't put out one pair because the earrings are huge and I figured no one would want them. I was wrong because they sold early on in the evening. Next time, I will make more wire pieces and have a much more even distribution of wire and glass jewelry.

The night wrapped up around 11. I was exhausted, but happy because I'd had such a nice evening. I hope I'm invited back to Ridgewood next month. Meantime, check out my jewelry at Naomi's Designs and MayaGirl Creations.