A few weeks ago, I wrote a blog post about working on your goals and making your dreams come true. Well, I wrote a more detailed version of that article for HubPages!
Here is the full version if you'd like to read it:
Naomi's HubPages Article
Thursday, March 29, 2012
Wednesday, March 28, 2012
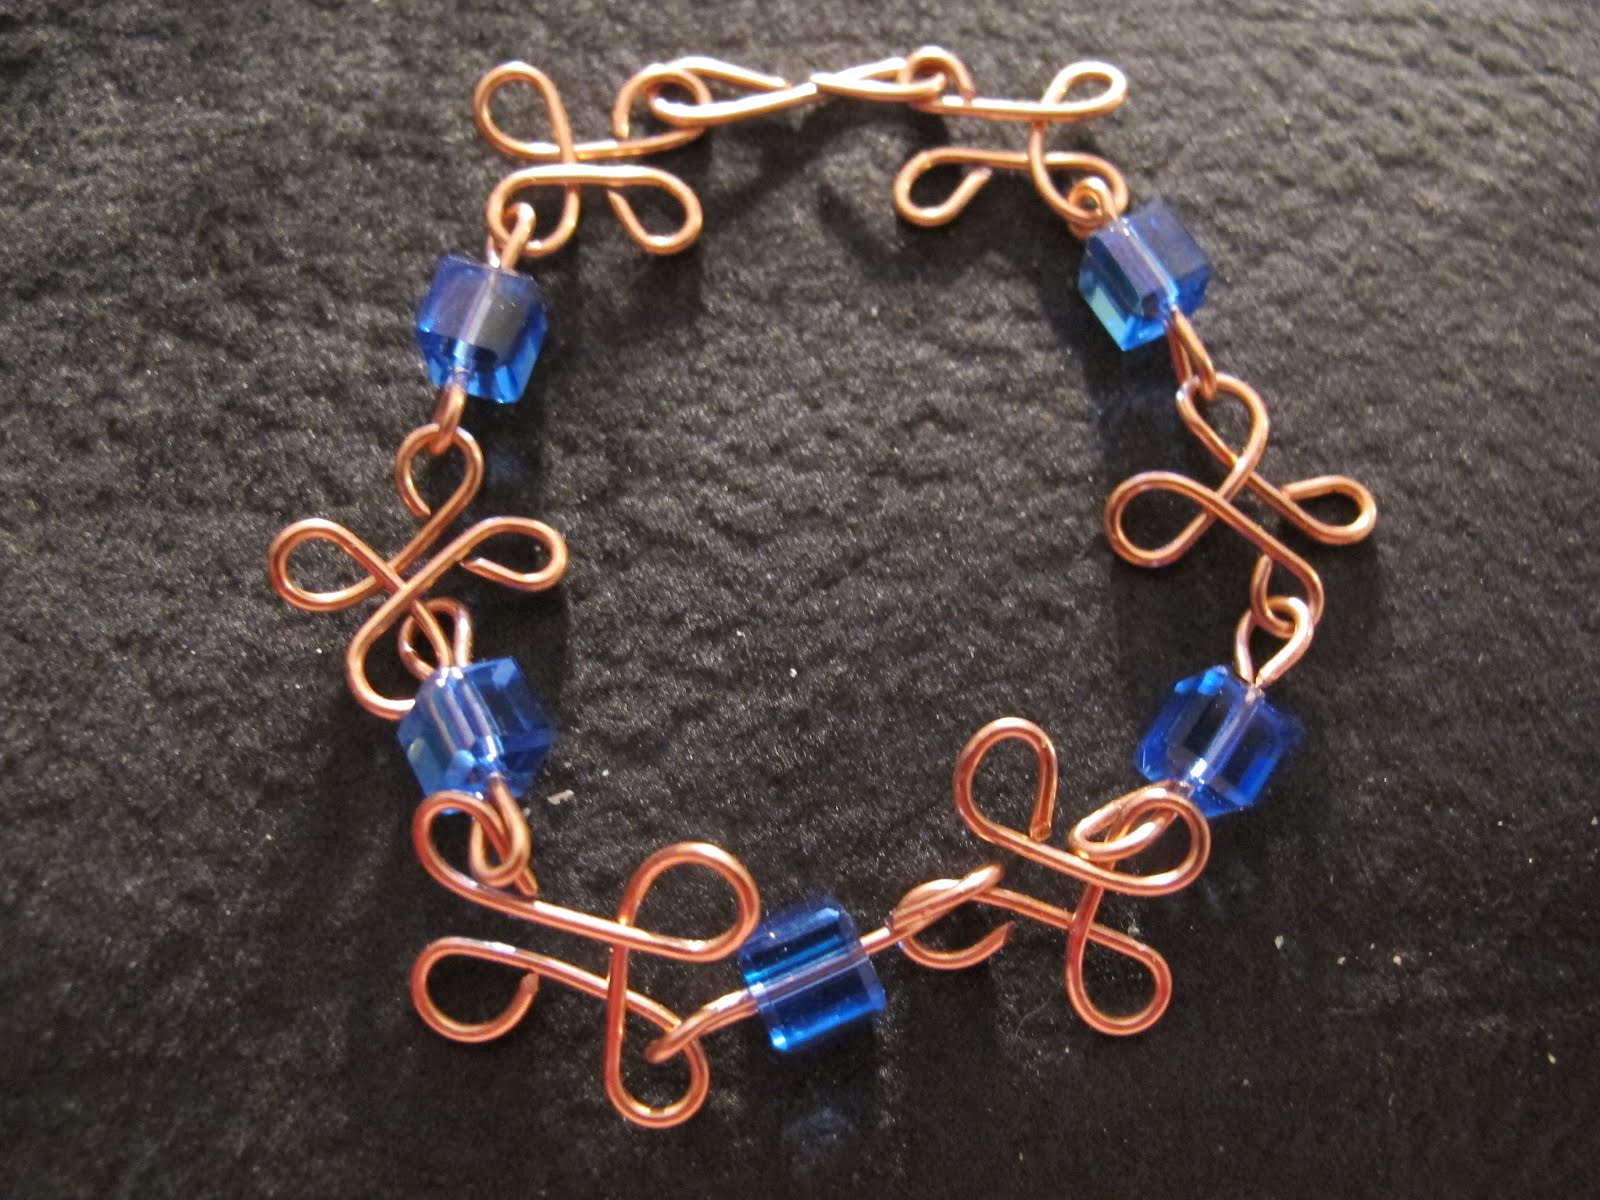
Wire wrapped jewelry patterns: make a wire wrapped copper bracelet
Good news! I am now sharing my jewelry making secrets on HubPages.
As I explained in my earlier post, I am now freelancing/designing jewelry full time. That said, I'm combining both of my skills and am writing instructional articles for simple wire wrapped jewelry projects.
The first project is a copper bracelet made of four-leaf clover links. It's really cute and easy to do. For more information, head to my HubPages article.

To purchase my jewelry, head to Naomi's Designs on Etsy.
As I explained in my earlier post, I am now freelancing/designing jewelry full time. That said, I'm combining both of my skills and am writing instructional articles for simple wire wrapped jewelry projects.
The first project is a copper bracelet made of four-leaf clover links. It's really cute and easy to do. For more information, head to my HubPages article.
To purchase my jewelry, head to Naomi's Designs on Etsy.
Monday, March 26, 2012
Mixed Metal Copper And Silver Jewelry Pieces
Now that I'm taking a metalsmithing class, I have so many more ideas for pieces. Being able to saw and drill jewelry is a useful skill and gives you so much more room for creativity. That said, I'm now making a series of mixed metal jewelry pieces made of copper and silver.
One is this copper heart that's wire wrapped with silver. I decided to combine my skills and created an industrial looking heart that hangs from a silver chain. That chain is handmade, too, by the way, and took a million years to make. Sawing the heart was a challenge because you have to get that top curve and the indentation, but I like how it came out:

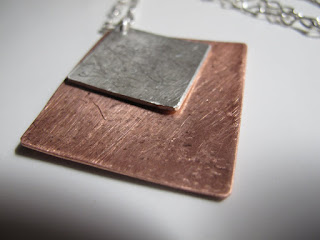
The next piece I made consists of a small silver square hanging over a larger copper square. I turned each on an angle to make them look like diamonds and hammered each to give them texture. This chain is also handmade. One thing to note: silver is harder than copper so it takes longer to saw. It also takes much more force.
This piece is very abstract, but I love the combo of the metals. I plan to get some brass sheets, too, so I can play around with those.
To purchase these pieces or my other jewelry, head to Naomi's Designs.
One is this copper heart that's wire wrapped with silver. I decided to combine my skills and created an industrial looking heart that hangs from a silver chain. That chain is handmade, too, by the way, and took a million years to make. Sawing the heart was a challenge because you have to get that top curve and the indentation, but I like how it came out:

The next piece I made consists of a small silver square hanging over a larger copper square. I turned each on an angle to make them look like diamonds and hammered each to give them texture. This chain is also handmade. One thing to note: silver is harder than copper so it takes longer to saw. It also takes much more force.
This piece is very abstract, but I love the combo of the metals. I plan to get some brass sheets, too, so I can play around with those.

To purchase these pieces or my other jewelry, head to Naomi's Designs.
Metalsmithing Class: My sterling silver ring with flower design
Here it is! Here is the mythical silver ring that I have been talking about all semester:

While I don't think it's my best piece, I'm proud of it. For a seemingly simple ring, a lot of work went into making it! First, I had to carve out the silver strip using a jeweler's saw, then I had to drill and saw out the flower design. Next, I had to file the entire piece. I then annealed the ring by torching it so that I could make the metal more flexible; next, I bent it into a ring shape.
Next, I soldered the ends together, then annealed it a second time. Finally, I sanded, polished and buffed it.
So there were a lot of steps in making it -- and it doesn't even fit me. It's about a half size too small (though it's sligtly big on my pinky). So if anyone reading is a size 8 1/2 ring wearer, you can buy it on Etsy.
To purchase more of my jewelry, head to Naomi's Designs.
Sunday, March 25, 2012
Metalsmithing Class Part VI
Last Thursday was a weird day for me. That morning, I was laid off from my job. Also, it was about 80 degrees out in March in New York City. Still, instead of just going home and enjoying this freakishly beautiful weather, I stayed in the city and went to my metalsmithing class that night.
During the day, I stayed in my husband's office and turned his conference room into a studio. I had all of my jewelry making equipment with me so I spent the afternoon carving shapes out of 20 gauge copper sheet metal. This gave me a chance to practice my sawing techniques.
I'm getting better at sawing metal, though it's still time-consuming. The diamond I made took me about an hour to cut, but sawing out a heart was much more of a challenge. I had to get that inner curve and the dip at the top of the shape, and that took a lot of work -- but I got it!
Since I didn't have a drill on hand, I improvised and used my center punch tool to create a little hole at the top of each shape (to string a chain or jumpring). The metal warped a bit from this, but I plan to hammer the cut-outs, anyway. I think I'll then wrap some silver wire aound them.
That night at class I did .... more sawing. This time, I sawed my cicular pendant. I sawed and sawed and I'm still only about 3/4 of the way done! And I still have to saw the inside. I guess I have the time to do some work at home now.
Our teacher showed us how to put a stone into a bezel setting and how to use a buffing machine. Working with the bezel seems a little complicated so I hope I don't mess up that part. The buffing machine is just scary; it's like a mini car wash for jewelry.
Our semester is more than half over so I really hope I can finish my pendant in time. Our last class is May 17 and I have a craft fair on the 19th. I'd love to have it ready for sale by then.
To purchase my jewelry, head to NAOMI'S DESIGNS.
Making Jewelry Full-time
Well, I have some big news: I was just laid off from my day job, which was writing for a soap magazine. Our company shut down two out of the three magazines that were a part of the soap group and had to let a bunch of people go. I'm in good company in being unemployed.
I'm going to miss my work friends very much, but fortunately, I have a lot of plans for the future -- so many in fact, that it's kind of overwhelming. I woke up this morning in a panic thinking, "Oh my God, how am I going to get all of this stuff done?" But then I thought, "Wait; I now have the time to do anything I want!"
Of course, at the top of my list is improving my jewelry business. I've been adding more and more items to my Etsy shop and plan to call some stores to see if we can set up meetings. I've been pleased with how the jewelry is going as a hobby, but I'd like to reach a point where I turn a profit. Right now, I'm still spending more than I'm making and need to catch up. I'm looking forward to working on my jewelry and writing full time, but need to make sure that I make at least *some* money and spend some time around people so that I'm not completely isolated.
I've also been trying to diversify my jewelry styles and jewelry business. The metalsmithing class is helping (I'll post some pics later when my pieces are complete) and, as you saw from my previous entry, am now making rings. Here are a few of the copper wire wrapped coil rings I've recently made:


To purchase my jewelry, head to NAOMI'S DESIGNS.
Sunday, March 18, 2012
Wire wrapped chandelier earring design gallery
By now, I've created an extensive collection of wire wrapped chandelier earrings with Swarovski crystal hearts and filigree design. I think I've used every color imaginable! But here's a look at them all together. To purchase any of them, head to NAOMI'S DESIGNS ON ETSY.


More Wire Wrapped Ring Designs
Here are some more of my wire wrapped ring designs. I basically use the same design as a base; I make a coil ring by wrapping the wire around in a circular motion. The shapes are created at the beginning and end of the process, i.e. I first make the spiral, do the wrap, finish the bottom portion of the ring. I then add the stones. Surprisingly, it's the last part -- the adding of the stones or crystals -- that takes the longest because I'm dealing with 28 gauge wire, which is very fine.
My friends say that a lot of my work looks Middle Eastern, That's definitely an influence, but I think I'm inspired by designs from around the world. I'm traveling to Nigeria soon so it'll be interesting to see what kinds of ideas I get from there.
Anyway, my rings are below. To purchase them or other jewelry from my shop, head to Naomi's Designs.


Saturday, March 17, 2012
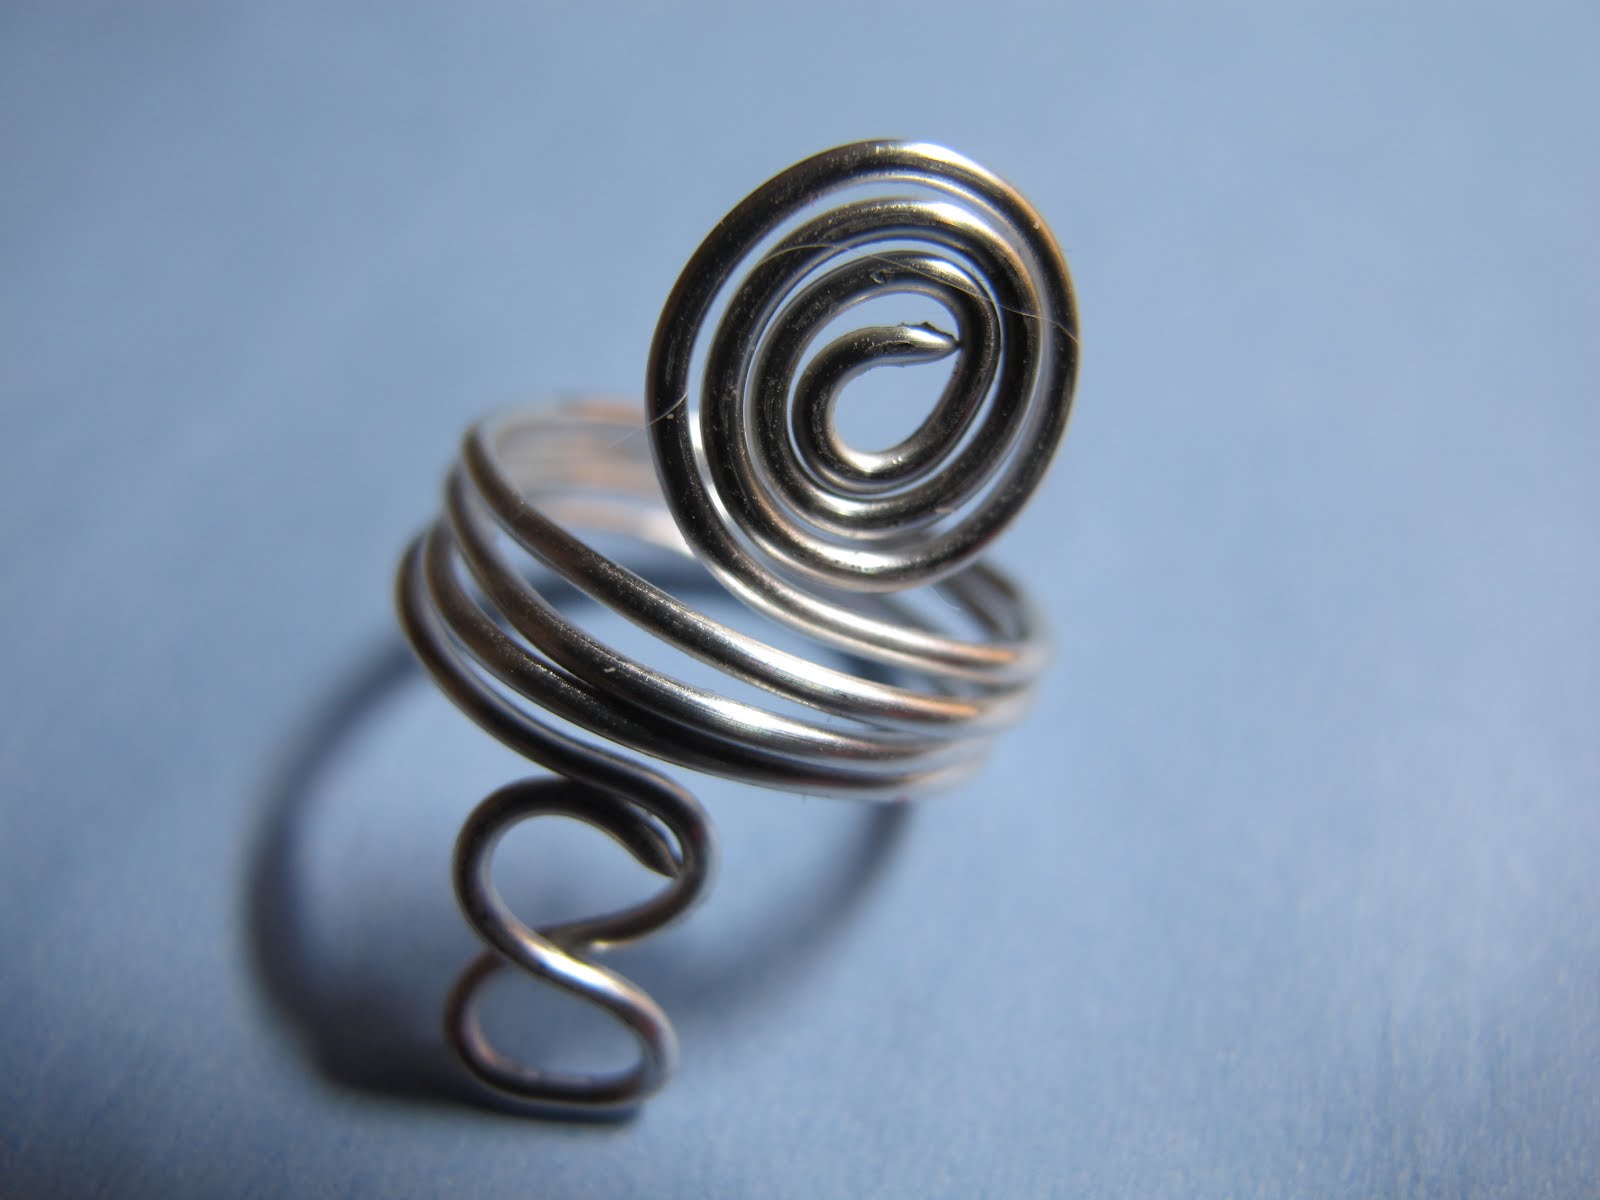
Silver wire wrapped ring with infinity symbol and spiral
If you've taken a look at my Etsy shop, you'd see that until now I haven't had rings for sale. I found them difficult to make and size and thought that earrings, necklaces and bracelets were more interesting. Lately, though, I've been on a ring kick.
After making my silver ring in metalsmithing class, I'm feeling more confident about the process. Granted, my new rings are made out of 18 gauge silver plated copper wire and are not carved and soldered; they're twisted, but I'm feeling more confident about designing and shaping them.
I love the idea of an infinity ring because the idea of a ring being a circle shape represents something never ending. That's why you have wedding rings and promise rings, etc. So I liked combining that concept with the round spiral and infinity symbol. All mean "forever" and I think this would be a great promise ring to give someone as a gift.
I also think it looks cool. I like the funky, abstract design and the geometric nature of the piece.
I'm still experimenting with more wire wrapped ring designs, so stay tuned!
To purchase my wire wrapped rings or other jewelry, head to Naomi's Designs.
Metalsmithing Class Part V
We're now down to five students in my metalsmithing class -- and ever since the class got smaller, it's gotten better.
I'm still not done with my ring (I need to sand and clean it), but I needed a break. So in my last class, I began working on my pendant. It's going to be a hammered copper disc with a carved radial design; in the center will be a deep blue stone with a sterling silver bezel wrap. I'm then going to make a silver chain. My original plan was to go with all copper, but the teacher suggested mixing metals.
I spent the last class drafting the design and then hammering the copper. It's amazing how difficult it can be to draw a perfect circle! It seems like it would be so basic, but you need the steadiest of hands. I traced a pill bottle to get the right size and kept slipping a little on the page.I finally got one that looks good, but I was beginning to feel like I was back in kindergarten and just learning how to draw shapes.
Once I did that, I had to chop the metal into smaller pieces with these giant sheers that look like a guillotine. I then hammered the copper so I could create a nice texture on the metal. I don't want the copper to be shiny and smooth; I want it to have a worn and weathered "antique" look. So I spent about an hour pounding the crap out of that metal! Let me tell you, it was a great way to get out my frustrations -- even though my arm was so sore afterward.
Next week, I get to drill and saw my pendant and then comes the fun part: wrapping and soldering the bezel. That's uh, going to be interesting. I'm a little scared because you have to be so precise with it. But I've gotten this far...
Our instructor show us some other cool things you can do with metal like stamp it and create "hemispheres." It's amazing how many options there are and it's fun, but a little overwhelming. I want to try every new skill she's showing us, but I have to pick and choose which techniques are right for each design.
To purchase my jewelry, head to Naomi's Designs.

Sunday, March 11, 2012
Metalsmithing Class Part IV
Last Thursday's class was actually really good -- much better than the first few. Only five students showed up so the teacher seemed to be much more relaxed and was actually able to take the time to show me stuff. She didn't seem to be annoyed with me for asking so many questions, as in the past. Maybe she just works better with a smaller crowd? I know that when I was teaching music, I much preferred one-on-one sessions than a classroom setting.
Anyway. I finally got to solder my ring! Basically, I had to place tiny bits on solder metal on the seam and then torch it. It was really cool watching it melt into place. Now my ring finally, well, looks like a ring. I just have to sand it even and clean and it''ll be finished.
Meantime, I showed my instructor my sketch for my next project, which is going to be a carved pendant with a set stone. She liked my idea and gave me some good suggestions, so I'm eager to get started. I'd really like to take a break from the ring as I've been working on it for several weeks, so I'm looking forward to working on something new. I'm feeling more confident around the tools (even though I'm still a spaz) so I'm less nervous about drilling and sawing out the design. I'll also be learning how to set a stone with bezel wire, so that'll be interesting.
As of now, I think I probably will take Jewelry II next fall. Though this class has been frustrating in some ways, I do like learning the new skills and I enjoy feeling like I accomplished something. I would like to learn how I can solder at home, though.
To see my (as of now) non-soldered jewelry, head to Naomi's Studio or Naomi's Designs on Etsy.

Wire wrapped copper chandelier triangle earrings with blue Swarovski crystals
As I said in a previous post, I've been trying to design more challenging pieces of jewelry. This weekend I finished these wire wrapped copper triangle earrings.
These earrings weren't technically hard to make, but were very labor intensive. Altogether, I had to make 42 little triangles -- 21 on each earring -- so that took a few days to complete. I think they look really cool, though, almost like a waterfall. My original plan was to weave the blue Swarovski crystals throughout, but I think that would have been overkill. I like how they turned out with just the little pop of blue at the top of the triangle cascade.
These chandelier earrings are pretty long at about 3 1/2 inches, but are surprisingly light-weight. I test drove them today while I was cleaning and almost forgot I had them on.
To purchase my jewelry, head to Naomi's Studio or Naomi's Designs.

Thursday, March 8, 2012
Silver wire wrapped chandelier earrings with sapphire blue teardrop crystals, spirals and filigree design
Wow, that's a looong title, but there's a lot going on with these wire wrapped chandelier earrings. These statement earrings were a true labor of love, but I like ho they turned out.
First, I made the filigree pattern - and that was the easy part. I then had to make every spiral, altogether 28. And then I had to made the links with the sapphire blue crystals. Sidenote: these crystals are not Swarovski; they're Celestial Crystals, which are available at Fire Mountain Gems. I love Swarovski, but they can get pricey. Celestial Crystals are also really pretty, but cost a lot less. They also have some different colors and shapes from Swarovski so I like to mix and match.
Anyway, once I had all of the parts, I put together the earrings. I then had to get all of the spirals to hang evenly, which took a lot of cutting and tightening and adjusting.
It took me a couple of weeks to finish these, but it was worth the work. I'm trying to make more complex, challenging pieces and I'm proud of these.
To purchase my jewelry, head to Naomi's Studio or Naomi's Designs.

Sunday, March 4, 2012
My cat, the best jewelry making partner
Okay, time for a silly, cutesy post. I just had to show off some pictures of my baby cat, Maya, who loves to keep me company while I make jewelry.
She's usually very well behaved. She doesn't grab at the wire or bat the beads around, or anything like that. But she does like to watch. So when I was working at the kitchen table, she jumped up to keep me company. She'll often stay there with me for hours. She's such a sweet girl.


For more of my jewelry, head to Naomi's Studio or Naomi's Designs.
Wire wrapped heart earrings with red Swarovski crystal hearts
I've made many earrings with Swarovski crystal hearts, but in this pair, I made the hearts themselves.
For these dangle earrings, I used a simple spiral design to create the interior curve of the hearts, then twisted the wire around to form the rest of the shape. I then attached two and finished them off with the red Swarovski crystal heart. It's a very classic triple heart design, but has an abstract take on it.
What I really love about these earrings is the way the gold and red colors play off of each other. They're very "warm" earrings because of the colors used and they look great with almost anything. I can definitely see pairing them with a little black dress. Sometimes the simplest designs can be the most complex.
To purchase my jewelry, head to Naomi's Studio or Naomi's Designs.

Wire Wrapped Lava Stone Pendant With Blue Swarovski Crystals And Filigree Design
I call this silver wire wrapped lava stone pendant Dark Side Of The Moon. The way that the wire wrap turned out looks a little like craters to me, which is why I gave it this name.
Lately, I've been experimenting with more complicated wire wraps. I'm trying to do tighter, more detailed designs that take more planning out, and this is an example of one.
I wanted to do some layers on the wire wrap to give it texture, so I had to go back over the initial wrap and add some loops -- but getting them to be in the exact right position took a lot of maneuvering and adjusting. Still, I'm happy with how this came out. I like the little blue Swarovski crystals; they add an extra sparkly touch!
Formore of my jewelry, head to Naomi's Studio or Naomi's Designs.

Metalsmithing Basics Class Part III
My silver ring is finally beginning to look, well, ring-like. I'm not quite up to soldering the ends together, but I'm close.
As everything else with this class, each step was a time-consuming procedure. I don't know if it's just this teacher or the process of metalsmithing in general that accounts for there being so much time to each step; I guess it's a combination of both.
I filed the ends of that ring for what felt like ages and even worked on it over the weekend, but it wasn't smooth enough for the instructor. She ended up filing it to perfection for me. Then I was finally able to heat the metal and soften it so I could mold it into a ring shape. Actually holding the flaming torch was a little scary, but it was cool! I felt like a badass knowing that I was melting down solid silver. I then had to dip it in acid to clean it, which again was a little unnerving, but the silver came out looking nice and shiny.
I then hammered the ring around a mandrel until it formed a round shape. And next class, I should be ready to solder the ends together ... uh, I hope.
I'll admit, I'm still not thrilled with this teacher and I can tell that she doesn't much care for me, either. I can be a dumbass when it comes to using machinery. I need a lot of instruction. But I know this. I know my weakness. I know that I need some extra times being shown how to work stuff, but the thing is, I also know that I WILL eventually get it and then I'll be really adept at using whatever computer, drill, torch, etc. So I ask a lot of questions. I suppose it can be annoying when you have to show someone how to do something multiple times, but I'd rather be annoying than pick up a torch and not feel 100 percent with it. I'd rather be safe and ask the "stupid" question and make sure I know what I'm doing.
Unfortunately, I can tell that this teacher who likes to rush through instructions, is fed up with me. She got a little snippy with me when I asked for the third time which way to turn off the gas on the torch. And you know what? I'll probably ask again. We have these classes a week apart (two weeks since the last, actually, since she went on vacation) and that's plenty of time to forget a procedure, especially when you're dealing with dangerous chemicals and there are multiple steps. So she may not like me for my incompetence, but frankly, she can kiss my ass. I paid good money for this class and I am going to learn the way I want to.
I'm still debating whether I want to take Jewelry II. I'd still like to learn more because I like the actual skill, but this awful teacher has soured me on the classroom environment. I've been watching a lot of videos about soldering and am trying to learn more on my own.
For more of my jewelry, head to Naomi's Studio or Naomi's Designs.

Subscribe to:
Posts (Atom)