Wednesday, April 6, 2016

Fused glass jewelry: Dichroic glass pendant "Fire And Ice"


I've been making fused glass jewelry for about a month -- and while I've had quite a few failures, I've happily had many more successes. There are quite a few pieces that I genuinely like and would wear myself. One of my favorites is my "Fire And Ice" pendant:

Dichroic glass is so much fun to work with because there are hundreds of different patterns available. I usually order a bag of scrap pieces, so I never know what I'll end up with. I enjoy the surprise! I'm also never sure what the jewelry will look like when it's fired in my microwave kiln. Dichroic glass changes color in the light, anyway, but it often turns out to be a completely different hue when fused. I've used blue dichroic glass which came out pink or pink glass that came out yellow. Using this kind of glass is always an adventure.

Because of this, I'm always pleased when a piece turns out better than I'd expected -- like my "Fire And Ice" pendant. I made a simple design by sandwiching blue tie-dyed glass between shiny yellow dichros. The blue ended up being a deeper color than I'd anticipated and the yellows are shinier with hints of oranges and reds. They reminded me of flames, which is my reason for giving the pendant this rather obvious name.

I recently sold this glass pendant to my good friend, Nancy. She's purchased a lot of my handmade jewellery over the years because she enjoys supporting small businesses. She wore several of my pieces on the recent cruise with took together and I got a kick out of seeing her in my jewelry designs. She was ready for something new and chose "Fire And Ice."

I was sorry to let the pendant go, but I know Nancy will wear it well. And I can still borrow it! That's one advantage of selling to a friend.

I've made dozens of fused glass pendants at this point. Hopefully, all will find good homes. You can check them out, as well as the rest of my handmade wire wrapped and enamel jewelry at Naomi's Designs and MayaGirl Creations.

Silver wire wrapped copper daisy anklet with blue enamel accents


I haven't posted about many enamel projects lately, as you may have noticed. I'm still at my enameling class every week -- I love my teacher and classmates -- but I've been in an experimental phase. I've been playing around with different enameling techniques and not all of my pieces have turned out so well.

I attempted to make a cuff bracelet so I could enamel something that isn't flat. Boy was that a mess! The enamel just wouldn't stay in place, even with the addition of Klyr-Fire (a clear, but sticky liquid used to keep enamel and cloissoinne wire in place). So I ditched the bracelet.

Now that I'm learning to make fused glass pieces, I next tried to create an enamel pendant that looked as if it were made of fused glass. I used large glass blobs that you can add to enamel to create texture and piled them on. At first, the piece turned out nicely, but I went overboard in adding the glass fragments... and I had another mess.

I then finally got something right! My teacher suggested that I add enamel to one of my wire wrapped jewellery designs. I didn't even realize you could do this; I figured the enamel would fall through the cracks since most of my designs are "spiraled." But I made one of my spiral daisies, added some blue enamel to the center... and what do you know? The glass stayed in place. Even better, I loved how it looked when I fired my piece.

I made several more daisies and turned them into a new version of my wire wrapped daisy anklet. I used copper because you can only enamel fine silver -- which is much more expensive. I originally planned to use a different color enamel in each flower center, but decided to stick with just one color instead: Prussian Blue, which is a deep, rich transparent enamel.

You might notice that the copper has a pinkish hue. This is what happens to the metal after it's fired and then cleaned in pickle solution. I wanted my jumprings and chain to match, so I also fired and pickled them.

I'm very pleased with the final result -- and I learned a great way to combine enamel and wire wrapping. This is relatively easy to do, too. I'm going to try some other color enamels with the copper. I think a pink would look pretty, especially since the copper turns that pinkish shade in the process.

Please check out the rest of my work at Naomi's Designs and MayaGirl Creations.

Friday, April 1, 2016

Wire wrapped jewellery: wire wrapped pendants made of fused dichroic glass


Now that I'm getting the hang of making fused glass pendants, I'm combining my dichroic glass art and wire wrapped jewelry skills. It seemed like a natural fit to combine the beautiful colors of the glass with the shimmer of wire and crystals.

My main problem in wrapping these pendants is that no holes are drilled through them. When I order ready-made focals, like lava stones, they have a hole drilled right through the center. I can then loop a necklace bail through the stone and wrap it, and the wire is very secure. But when you make your own pendants, it's up to you to add that hole. When making an enameled piece, I simply drill the hole into the metal before adding the glass power. With fused glass, though, it isn't that simple.

Some people add a bit of fiber paper between the glass so the material fuses around the paper and forms a hole. This doesn't work so well in a microwave kiln where the glass heats very quickly. I tried this and ended up with a melted blob. You can also use a diamond drill, which is strong enough to drill through the glass. However, there's always the danger of cracking the glass if you're not careful.

For my pendants, I'm skipping these steps and am going back to basics -- as in kindergarten basic. I'm just using glue. The microwave kiln kit came with a few glue-able necklace bails, which I attached with Krazy Glue. Once I used up all four, I've been making my own attachable bails. I make a little spiral with a hook on top and then glue it to the back of my pendant. That's all there is to it.

Part of me feels like I'm "cheating" by using glue, but you can't solder glass and this method works for me. And, hey, my enameling teacher liked my spiral bails, so I've got her approval. Plus, that Krazy Glue is super strong. Believe it or not, I've never used it before... and once it dries, wow. At first, I kept getting it on my fingers and the only way to take it off is with acetone (nail polish remover).

Anyway, once my bails have been glued and set, I can wire wrap the pendants. I usually use just one piece of wire for a pendant, but here, I have to first wrap the wire around the top loop to secure it. I can then create my design and add crystals, etc. I'm learning not to go overboard with the dichroic glass because the glass stands out on its own. It doesn't need too much embellishment. I've been adding more crystals and wire wraps to the plain pendants, but I've been trying to keep the wrap around the edges on the colorful ones. Some pendants don't need any wrap at all; I just leave them be.

My handmade jewellery is always a work in progress and fused glass is still pretty new to me. Keep checking in to see my latest pieces! And check out my collections at Naomi's Designs and MayaGirl Creations.

Thursday, March 31, 2016

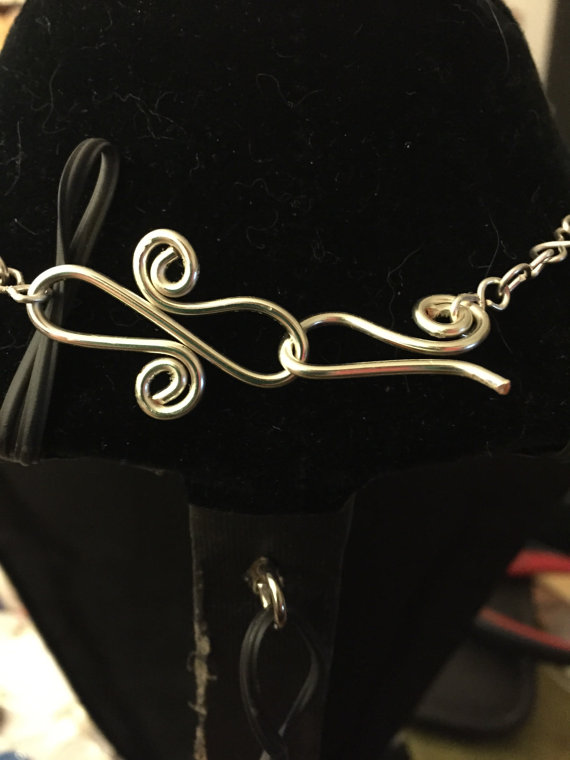
Handmade custom jewellery: Silver wire wrapped giant flower necklace with fancy wire wrapped clasp


I have a couple of "regulars" on Etsy who come to me every few months with ideas for custom orders. One customer, in particular, really likes pieces with fancy earring hooks or clasps. I'll admit -- I don't pay as much attention to jewelry findings as I probably should. I usually just create simple earring wires or a standard hook clasp for necklaces, so I've enjoyed her suggestions.

One of the latest pieces she had me design was this giant flower silver wire wrapped necklace:

I have many flower pieces in my shop, but they're all pretty small; the flowers are part of a ring, bracelet or anklet. She asked me to take my design and create a flower that's at least three inches across. She also wanted six petals instead of eight.

These probably sound like small requests, but I've made literally thousands of these tiny daisies and have it down to a science! Honestly, if a petal is slightly out of wack, no one will notice when the flower is stuck in the middle of an anklet chain. But with this big, focal daisy, the dimensions and petals had to be as perfect as possible.

I didn't want the petals to be "floppy," so I used extremely thick 14 gauge silver plated wire. You can't even cut this stuff with standard wire clippers; you need the industrial strength pair. I then worked on this daisy for a couple of hours, measuring out every angle. The petals are not 100 percent... but I'd say they are at least 95. Not too bad since I do all of this by hand and don't use a machine.

Next, I worked on the clasp. Even though she wanted something unique, she still wanted it to be practical and easy-to-use, so I made a variant on the hook clasp I usually do.

In the end, she was pleased with my design. Whew! I'm always a little nervous when doing a custom order. I'm confident in my skills, but I still fear that the customer won't like my final product. So I'm always relieved when they're happy! Still, I enjoy collaborations and am impressed with the ideas my customers think up.

Do you have an idea for a custom piece? Give me a shout at Naomi's Designs! Also, check out my kids' jewellery line at MayaGirl Creations.

Wednesday, March 30, 2016

Adventures in making fused glass jewelry: handmade wire wrapped dichroic glass pendants!


I've had my microwave kiln for about a month now -- actually, I'm up to my second kiln, but I'll get to that story later -- and I can't believe how much fun I'm having with this thing! I love being able to make fused glass pendants whenever I want... even if there have been a couple of, er. incidents along the way. I have had some successes, though. Here are a few of my favorite pieces, so far:

As you can see, I've taken to wire wrapping the dichroic glass necklaces and turning them from simple glass pendants into something even more exciting. Many of the pendants, though, are interesting-looking on their own and don't need the addition of wire or crystals. I let the patterns guide me.

Making fused glass jewelry at home is pretty simple, if you have basic jewelry-making skills. You need to know how to score and shape glass. You also need proper equipment, which isn't included in the basic microwave kiln kit. They give you a really crappy scoring tool, but you should also have cutting pliers, as well as a tool that lets you snip edges. I'm still pretty new to this, so I'm learning much as I go on. I'm thinking of purchasing an etching tool, too.

When making fused glass -- at least in a tiny microwave kiln -- you have to accept that this isn't an exact science. A lot of the pieces I've made have depended purely upon luck, though I'm getting much better at making things turn out the way I want.

The most important lesson I've learned so far is to not layer pieces too high. Generally, it's best to use two layers: a base color and then I usually put dichroic glass on top. That top layer should also be slightly smaller than the base piece. If not, it will slide off and cause a mess in the kiln. I learned this the hard way!

A couple of weeks ago, I attempted to make a three-layer piece using a black base topen ped with small dichroic cut-outs and then a piece of clear glass. This didn't work. The clear glass was heavier than the dichroic pieces and fell right off while in the kiln. However, it still melted when it was heated and stuck to the side. I almost set a fire in my kitchen, burned and cut my hand... and wrecked the kiln. Happily, these kilns aren't too expensive, but it was a costly and potentially dangerous lesson.

I now have a new kiln and fire my pieces in stages. Oddly enough, this kiln takes three minutes to heat the pieces, while the other -- which was the exact, same model -- took about four. I heat the glass for two minutes and check on it to make sure it's fusing together. If I see that any glass has slid off, I stop the firing process. If the glass is fusing well, I continue to fire the piece for 30 second increments until I see that the glass has turned molten and the sides are rounded. The first time I used this kiln, I set it for four minutes as I had with the previous one and my glass overfired, looking like a gray blob. Live and learn!

It is possible to do a triple layer, but the top pieces need to be the smallest. So if you layer, say, black with clear and then a mosaic of tiny dichroic pieces, it will probably fire well in the kiln.

It's also important to note that not all glass is created equal. I use glass that has a 90 COE (coefficient of expansion), but some brands' glass just doesn't work in the microwave kiln. One company (I'd rather not name them) has gorgeous glass, but it constantly breaks in the microwave. I really like Fuseworks and iDichroic's glass. They send a package of dichroic scrap and you get a nice variety. The glass also holds up well in the kiln. The other glass probably works very well in a traditional kiln, where you can take the time to fire a piece. But it falls apart in the microwave where the materials are heated quickly.

As times goes on, I'm getting better at cutting small pieces and EVEN edges. Like anything else, this takes practice. Happily, I love making fused glass and have been designing pendants every day. I'll show you more of my work along the way.

Meantime, check out my fused glass and wire wrapped jewelry at Naomi's Designs.

Silver wire wrapped bridal necklace with lavender purple stones


I get many requests for custom orders, but a couple of months ago, I got a very special request: my friend, Timothea, asked me to design her wedding necklace. The happy bride-to-be is tying the knot in May and asked me to make a one-of-a-kind piece for her.

Timmie was open to any type of design, but did want me to include a purple stone because her dress has a purple sash. I showed her some different ideas and she chose a teardrop-shaped lavender focal made of crazy lace agate. The stone is dyed; the purple isn't its natural color, but she was more interested in its appearance over the purity. I used silver plated wire for the rest. Again, no materials were expensive, but beauty doesn't have to be costly.

Last year, I designed a bracelet and fancy headpiece to wear to my friends' wedding, but this was actually my first go at making a full-on bridal necklace. Before choosing a design, I studied a photo of Timmie's dress and looked at some pictures of other existing wedding pieces. Timmie's dress is pretty simple with a plunging neckline, so we decided to go for a longish Y-shaped piece to mirror the outline of the bodice. I eventually came up with this design:

Yes, I twisted and created every one of those curls in the filigree design. I don't even know how many Swarovski crystals were included, but I went through almost an entire pack of 144! I originally planned to use just one purple focal... but this is for a wedding. Why not go for two?

The biggest challenge was finding a way to center the stones in those filigree frames -- but to hang the stones in a way that they'd stay secure and not dangle and flop. I ended up threading the wire all the way through the stone and working that portion of the wire into the filigree design.

I have to say, Timmie was the most laid-back bride -- definitely NOT a bridezilla. I sent her photos showing her the piece during each stage of its creation and she kept encouraging me to continue. It felt good to have so much freedom and creativity.

The necklace is now safely in Timmie's hands as she counts down those final days to her wedding. Congrats, my friend! It was an honor to make this for you.

Check out more of my wire wrapped jewelry designs -- or request your own custom piece -- at Naomi's Designs or MayaGirl Creations.

Thursday, March 3, 2016

Adventures in making fused glass jewelry: my new toy, a microwave kiln!


Whew, things have been busy in Jewelry Land. I'm working on some new enameling projects, just finished making a necklace for a friend's upcoming wedding, and just completed my glass fusion course. Meantime, I bought myself a new "toy," a Fuseworks glass fusion kit and microwave kiln!

Much as I enjoyed my glass class, I was disappointed with the jewelry-making component of it. On the last day, I finally got to make some colorful pendants and was excited to see how they'd turn out:

This is the "Before" picture, where they kind of look like a smorgasbord:

Unfortunately, they did not turn out well. My teacher was away on vacation and was then sick, and another person took over the kiln for him. Normally, my teacher would supervise as I set up the kiln, but the kiln was being used. Therefore, another glass tech promised to heat my items for me. Since my teacher is the only one there whose specialty is fused glass, I'm not sure this other guy knew what he was doing. When I picked up my pendants yesterday, they looked like this:

They're cute, I guess, and definitely colorful, but the fuse-job is weird. Technically, the glass pieces have been fused together in that they're stuck on one another, but the glass doesn't have that beautiful, melted quality that I love in fused designs. I don't want to pay for extra kiln time, though, so I'll keep these as is. If I wire wrap them and add a chain, I can turn them into funky pendants.

The good news is, I DID learn a lot in that class and truly enjoyed myself. It inspired me to purchase my microwave kiln so I can make my own glass jewelry at home.

The Fuseworks set comes with various sheets of colorful glass, including my favorite, dichroic. Basically, dichroic glass is patterned, shiny and prismatic, so it adds a beautiful sparkle to your pieces. The kit also comes with protective gloves, jewelry findings and a glass scoring tool. Oddly, it does not include a glass cutting tool... which is kind of like being given a fork and no knife. You can find plenty of inexpensive ones online, though.

The kiln itself is a small, round structure, just large enough to heat a pendant or some earrings. You cut the glass, place a sheet of kiln paper on the kiln base, carefully lay out your item, put the lid over the kiln and then set your microwave. I've found that my microwave successfully fuses the glass when kept on for four minutes at regular temp. Many people heat it on high for about two minutes. I suggest playing around. Start with less time, see if the item has fused -- it should be blazing red and molton -- and if not, continue to heat it.

VERY IMPORTANT: Do NOT touch the item! It is HOT! Really hot. 1500 degrees hot. Ouch. Always wear eye gear and those protective gloves.

Anyway, once I see that the item has fused, I put the lid back over the kiln and let the item cool for about an hour. I made the mistake of picking up an item before it had fully cooled and it cracked. I also burned my hand. Stupid, Naomi, stupid.

Here are some pieces I've created so far:

It didn't take me too long to figure out how to actually melt the glass since I do have enameling experience, but it has taken me some practice to determine which colors work best together. My first few pieces -- those elongated green, black and blue ones -- look a bit muddled because the colors blended together. You just can't use darker shades on black or they'll sink into it. Same for using blue on blue. I love the smaller white piece with the green stripe on top, but that's the one I cracked. I'll try to glue it together later today.

The black piece that I have pictured solo is my latest creation and favorite. I made this by using three layers: a black base, a clear dichroic middle and then the colorful dichroic pieces on top. That clear layer in between the black and colored glass provided a buffer so the colors didn't get lost in the darker shade. I also like how it looks as if the top layer is floating.

I'm really loving this new gadget and can't wait to make more things. The kit doesn't come with much glass, so I've ordered more. It's pretty easy to use, but it does help if you have some sort of fusing and glass-cutting experience. Supposedly, you can also heat precious metal clay and enameled pieces in the microwave kiln. If you're a craft lover, I highly recommend getting a Fuseworks. I'll be back with more photos when I turn these guys into necklaces.

Meantime, check out my wire wrapped and enamel jewelry at Naomi's Designs and MayaGirl Creations.