Showing posts with label making glass in a microwave kiln. Show all posts

Tuesday, March 13, 2018

Fused Glass Cabochon Pendants Made With Glass Frit -- And A Glass Tutorial


I've loved making heart pendants with my glass molds and purchased a few other molds in different shapes. I have teardrop and trapezoid molds on order and I also have a circle design. The simple cabochon might seem like a very basic shape, but you can do a lot with a circle! After all, our entire solar system -- and beyond -- is made of circular and spherical objects.

So far, I've made two round pieces: my Sunrise Pendant and my Planet Pendant. I created these color combinations simply by arranging and fusing glass frit in a design. For the Sunrise pendant, I went with typical early-morning colors: red, orange, pink and yellow. I suppose this works as a sunset, as well, but I think of evening colors and being more red, pink and orange. That yellow adds brightness to the pendant and gives it more of a "morning" feeling.

For the Planet Pendant, I simply combined blue, green and white glass so it looks like a continent surrounded by water and ice caps. It's not quite Earth, but similar. I've named it "Naomius" because why not?

I'd love to try making a Jupiter-like pendant with stripes or even a wire wrapped Saturn pendant. My friend Judith suggested that I make a cabochon to represent each planet in our solar system and then put them together in a mosaic or shadow box, but that seems a bit too 7th grade science fair project to me. Jon likes her idea, though, so maybe they're on to something.

In other news, I did something today that I haven't done in YEARS. I wrote an article for HubPages. For a while, I wrote for them almost every day -- especially after I left the magazine -- but it was a lot of work. Eventually jewelry and life took over and I had less time. It's a great way to get one's name out, though, and is another way to advertise my business. So I put together a tutorial on making basic fused glass pendants with a microwave kiln. I go into pretty thorough detail on the types of glass you can use, and how you can best use the microwave for this project. I also have photos of my work. I've included links back to my various sites, which helps me, but at the same time, I hope my tutorial can encourages others to take up glass fusion. It's a win-win! You can see it here at HubPages.

If you're not interested in making your own glass jewelry or art, please check out my page. Naomi's Designs. I'm constantly updating that, as well as this blog, so be sure to stop by often!

Tuesday, March 28, 2017

Adventures in teaching how to make handmade jewelry: making handmade glass earrings at Maple Grove Cemetery


What a great weekend I had ... spent at the cemetery! I've been teaching at Maple Grove for a few months now, but I still get a kick out of saying that.

The weekend began with a 1950s-style tea party, which was held in Maple Grove's main reception hall. I didn't wear a costume (that's me in the black top with the roses), but many of the attendees dressed up in vintage outfits. Some borrowed their mother's clothing or donned outfits that they'd worn back in the day. The woman at my table who is holding up the plate of treats even wore a poodle skirt and an "I Like Ike" pin. She and the other people at my table decided that in my all-black ensemble I could be a beatnik.

I didn't really know anyone there other than the organizers, so I was a little nervous when I entered the hall. Happily, everyone was very friendly and I had a great time chatting with my table mates. When I mentioned that I teach jewelry there, they were like, "Oh, you're the jewelry lady!" I then ran into a couple of my students who'd forgotten my name and they also referred to me as "The jewelry lady." So I guess that's my new nickname: Jewelry Lady.

I expected to be served some tea and sandwiches, but we were presented with a feast -- most of it made by our organizers Helen, Carl and Celeste. There were, of course, tea sandwiches, as well as cupcakes, muffins, mini tarts, cheese cubes, fresh fruit, little cakes. Everything was delicious and I ate way too much.

We also enjoyed a quartet and singers who performed '50s songs, as well as a history lecture about Volney Chapin Daggett, who is buried in Maple Grove. He perfected cold cream so that it wouldn't turn rancid and had a longer shelf life. He was also the founder of Daggett And Ramsdell, a cosmetic company that still exists.

On Sunday, after I'd recovered from the festivities, I returned to the cemetery so I could teach a class on making fused glass earrings. The group was smaller than usual, but this gave me the chance to teach my students some more advantage glass fusion techniques. One student has been to all of my classes so far and has been dying to make a triple layer piece. I hadn't been able to let her because those pieces take longer to fire and with so many students, kiln time is precious. I was finally able to give her to go-ahead and she was ecstatic.

Though I pre-cut pieces for everyone, I like to give my students a chance to score and cut their own glass. I was pleased to see that this woman was able to successfully cut pieces without any help. She's been paying attention! Her earrings turned out beautifully and she was really pleased. A couple of students even had time to make pendants.

While we waited for the glass to cool, I showed everyone some basic wire wrapping techniques and had them practice making round and square spiral shapes. "It's so much harder than it looks!" said one woman. The above-mentioned regular admitted that the wire frustrates her and she much prefers working with the glass. I understand because soldering was frustrating for me, but I took to enameling right away. I guess certain types of jewelry techniques "speak" to people while others don't. She said that creating glass pieces is "addicting," which makes me so happy. I love working with glass and am thrilled to know that others appreciate this art form.

While we finished our pieces, we chatted and munched on leftovers from the tea party. Technically I was working, but this didn't feel like it at all. It was more like I was hanging out and making crafts with friends. Having large groups of students is fun, but I really enjoyed getting to know the others in this intimate group. Some say that you should aim to find a way to get paid doing the thing you love. That's exactly what I'm doing and this cemetery class is one of the best "jobs" I've ever had.

Check out my handmade jewelry at Naomi's Designs and MayaGirl Creations.

Thursday, March 9, 2017

Making fused dichroic glass jewelry with decals: mystical pendants


So far, April is shaping up to be a crazy, busy month! On April 9, Jon and I will be celebrating our 17th anniversary. 17 years!!! Where did the time go?! There is also Passover, our niece's birthday ... and craft fairs galore. I've been invited to Ridgewood Market's next event on April 22. Then, from April 27-30, I'll be selling Naomi's Designs at the Readers Studio Merchant Faire. Whew!

I wasn't sure if I should sign up for Ridgewood next month because it's so close to the tarot convention, but Scott said to me, "Naomi, it's your JOB." He's right. I'm spoiled because I'm so used to working in the comfort of my home, but I should take the opportunity to sell at events if space is offered to me -- especially if it's a fair where I've done well. I enjoyed my experience at Ridgewood, so why not? Jon can sample more beers and I'll finally try one of the giant pretzels they sell there.

Since I have over a month to prepare, I'm making several new pieces each day. My plan is to fill another 36-slot ring box since I sold several of those last time. I'm making more wire pieces. I also plan to sell the $5 wire pendants I'd made for my sales at the senior homes. I figure the bigger the range of merchandise and prices, the better chance I have of getting customers.

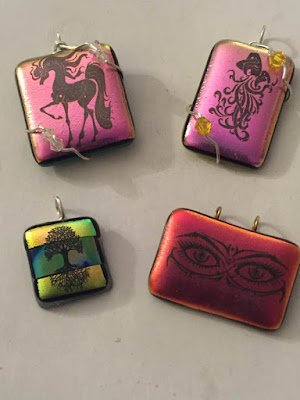
I'll only have 3-feet of table space at the tarot convention, but I'm going to fill it with pieces that reflect the theme. I know next to nothing about tarot, but I did go to a salon which was hosted by the Readers Studio founders. I learned the basics and got some ideas for jewelry that the attendees would like. Using glass decals, I'm creating mystical-inspired pendants that are colorful and fun:

Out of this batch, my favorite is the red All-Seeing Eyes pendant. It's just so creepy and cool. Those eyes came with a set of decals I ordered that feature dragons, unicorns and Zodiac symbols. When I saw those eyes (no pun intended), I knew I had to make something with them.

The opportunity came up when I played around with different colored base glass. I usually use black, clear or white base glass, but after making so many items, I ran out. I was left with blue, green and red and wanted to see what happened if I mixed certain colors. When I use neutral bases, the solid dichroic "Candy Apple Red" turns orange... but when I fused it onto a red base, it turned blood red. I loved the shade and the pendant shape happened to be perfect for those eyes, so I added them on.

I'm not sure what they are. At first, I thought they were Eyes Of Buddha, but they don't match the other images I looked up. I guess they're just supposed to be all-seeing, all-knowing eyes.

I felt like the unicorn and Aquarius symbol needed some embellishment, so I added crystals, but the eyes work well on their own. Simple and ... eye-catching (pun intended this time!).

Check out the rest of my jewelry at Naomi's Designs and Mayagirl Creations.

Sunday, March 5, 2017

How to make fused glass in a microwave kiln: large versus small kilns for making glass jewelry


When I was at the craft fair yesterday, many customers were intrigued to hear that I make my glass jewelry with a microwave kiln. A few wanted more details and wondered which is better: a large or small kiln? After working with dichroic glass for a year, I'd say that both are useful for different reasons. Here are some pros and cons for each.

SMALLER MICROWAVE KILNS: I think these are perfect for beginners. These kilns become hot at 1500 degrees F and the smaller ones are less cumbersome to handle. So as you're getting used to opening and closing the lid, checking on the piece, etc., I'd recommend starting with the small one. They're also less expensive, so why spend the money until you know you truly enjoy making glass?

As an intermediate glass maker (I refuse to call myself a "professional" at this point), I prefer using the small kiln for fine detail work. Because it heats quickly, I find that it's good for firing pieces at a particular stage or for adding decals. The small kilns heats within a few seconds, so I can heat items in 10, 15-second increments and then stop the process at the exact moment I want. This is especially effective when I want to purposely underfire an item or play up a particular glass texture.

Having it heat quickly is great when you're an impatient person like me, but large glass pieces tend to break when they gain too much heat at once. I've learned to deal with this by slowing down the heating process, but it's frustrating when your glass cracks right down the middle.

LARGER MICROWAVE KILN: The big kiln is bulkier and more difficult to handle. When I need to bring it to class, it's a pain fitting it into my bag. It also take about 8-10 minutes (depending on the microwave) for it to even begin heating.

Still, there are many advantages to using a large kiln. For one thing, it holds more pieces, which is especially helpful when I'm teaching. Because it heats more slowly, large pieces fire more evenly. I can stick a big piece into the large kiln, set the timer for 8 minutes and not have to worry about cracking. Even better, the slow heating time helps smooth out jagged edges, so glass that was cut on an angle ends up lining up with the rest of the piece.

The large kiln works best for larger pieces, however. When I've heated a batch of smaller ones, not all of the pieces have fired at the same rate and I've had to re-do them. Not does the big kiln work well for decals, which tend to come out over or under-fired. Of course, it's also more expensive.

Overall, I'm happy with both of my kilns and am getting better at using each for different techniques. Mostly, I love the fact that I can make beautiful pieces in my apartment -- and that the kilns are portable, which allows me to teach in different places.

Whether you get a large or small kiln, you'll enjoy your foray into glass making. Of course, wear gloves, protective goggles and always, ALWAYS put safety first!

Check out my handmade glass, enamel and wire wrapped jewelry at my WEBSITE/STORE or Naomi's Designs and MayaGirl Creations.