Showing posts with label fused glass. Show all posts

Wednesday, March 28, 2018

Fused dichroic glass decal pendants: Hope and Faith inspirational jewelry


A few months ago, I introduced glass decals to a couple of my senior classes. I cut up large strips of solid-colored dichroic glass and brought in a variety of decals for them to choose: hearts, butterflies, dragons, palm trees, dogs and cats, beach scenes, suns and moons, and inspirational sayings. Many of my students are animal-lovers like me, so I figured we'd go through the dog and cat decals pretty quickly.

To my surprise, only one person included a cat and only one used a dog. And almost the rest used either hearts, beach scenes, smiling suns... and inspirational sayings. In fact, I had several people who made pendants that included a sun and something like "Hope" or "Live, Love, Laugh" underneath it.

It was an interesting "social experiment" and made me think about why the seniors were so drawn to these images. I suppose that when you can no longer travel as easily, a beach scene is a reminder of a vacation. And I suppose when your health is failing -- as is the case, unfortunately, with many of my students -- it's comforting to admire a smiling sun or remind yourself to simply have hope. Or maybe I'm going too deep with this and my students just thought the decals looked cool.

After my lessons, I had some leftover decals, so I took a cue from my seniors and made my own Hope, Faith and Sun pendants:

That pink and gold dichroic glass is beautiful, but when I purchased it, I hadn't realized that it's textured. That made applying the decals a bit challenging because they work best when they're fired onto a smooth surface. To compensate, I did a very slow firing, using 15-minute increments. It was tedious, but it worked because you can clearly see the decals.

I sold a few of these pieces at my next show and noted how many people were drawn to the sayings or the sun. I guess having an inspirational reminder is something that everyone can use. It's nice to have a little pick-me-up, especially when it's included in a beautiful piece of glass. So thank you to my students for giving ME an idea!

Check out the rest of my handmade glass and wire wrapped jewelry at Naomi's Designs.

Thursday, March 22, 2018

Adventures In Selling Handmade Jewelry: My First Exhibition


Before getting my glass mosaic into the Rockaway Artists Association's Studio 7 Gallery, my work was included in Independent Artworld's "Limitless" exhibition.

Independent Artworld is run by Lilly, an FB friend and former acquaintance from the 92nd Street Y, where I took jewelry classes. She puts together "pop-up galleries" around the NYC/NJ area. She invited me to participate in her October pop-up, "Limitless."

I once displayed a couple of my wire pieces in our local restaurant, but hanging glass jewelry in a shadow took some work. With the wire pieces, I could stick pins through the loops and hang the pieces that way, but obviously this wasn't an option with glass. Lilly and I spent several hours fussing with the layout until we managed to get a nice, clean look. She came up with the idea to pin the jewelry from the back, hang the chain, and then let the pieces drape. It worked!

The event was held in Jersey City, which I'd only been to a couple of times. It's actually an interesting neighborhood, with many Indian restaurants -- my favorite! It's also an up-and-coming area for galleries and artists. Still, I was a bit surprised when I learned that the pop-up "gallery" was actually being put together in the lobby of a take-out Chinese restaurant. Art and egg rolls!

Lilly had a decorating plan, though, and constructed a really beautiful space featuring about a dozen artists. The other pieces were stunning and I was in great company. As you can see from these photos, it really looked like a permanent gallery. If I hadn't told you, you'd have know idea that a take-out counter was only a few feet away!

To kick off the month-long exhibition, there was a reception for the artists, which included some live music. Lilly suggested I wear all black, so my colorful pieces would really stand out. It felt really good to see my jewelry professionally displayed along with some great art. I even sold one of my triangle necklaces!

Since we were in Jersey City, Jon and I took advantage of the neighborhood and enjoyed a delicious Indian dinner at one of the nearby restaurants. I unfortunately don't recall the name of the place, but there are dozens of great restaurants in the area. We'd love to return when it's warmer and explore more of JC.

Every artist has to start somewhere and I'm grateful to Lilly for giving me this opportunity. I admire her for supporting artists and for actually doing something to give them a showcase or their work. She proved that you can make any place beautiful if you add some art -- even a take-out joint.

Check out more of my handmade fused glass and wire wrapped jewelry at Naomi's Designs.

Monday, March 19, 2018

Fused Dichroic Glass Statement Necklace And Earrings: Making a glass jewelry set


Since I didn't keep up with this blog for a few months, I'm still catching you up on what's happened in my jewelry-making life. Well, last fall, my glass jewelry was accepted into Vermont Artisan Designs Gallery in Brattleboro, VT.

Brattleboro is a cute, artsy town that's known for its eclectic stores and galleries. On the first Friday of each month, there's a festival and gallery walk, where stores open late and attendees can enjoy free concerts, food samples, etc. We were fortunate to be there for First Friday in August when we visited my sister-in-law and her wife.

After scarfing down a delicious shake and fries at Brattleburger, we attended a classical music concert that was held in the atrium of a nearby mall. The musicians played antique instruments, including a flute from the 1700s. This was particularly interesting for me since I'm a flautist.

We then took in a different "concert" of sorts and joined the town's "Ukulele Flash Mob," which was held in the little park in the center of town. This was exactly what you'd imagine: about 200 people -- all with ukuleles -- played songs together or sang, as we did. It was really bizarre, but amazing, and I'll admit, I shed a tear when the group performed "Over The Rainbow" by Hawaiian artist, Iz.

We finally went on the gallery walk and stopped in Vermont Artisan Designs. The store is full of gorgeous pieces made by local artists, including glass sculptures, pottery and paintings. They also sell jewelry and I purchased a pair of dangling sun and moon earrings. Jon then said to me, "You should sell your stuff here."

Remember, this was the summertime, so I was in shorts and a T-shirt, with my messy hair pulled back. I also had a couple of stains on my shirt from Brattleburger. In other words, I wasn't exactly dressed to impress. Still, I figured I was IN the store, I might as well ask about selling my items. So I showed a few pictures of my work to the manager and she was impressed. She said that they do accept pieces from New Yorkers and suggested I send in some items to the owner. I'm all about taking chances and cold calling. And while I don't recommend "selling" yourself when you look like a mess, I do recommend that you speak up and go after a goal.

Long story short: I did, and he accepted me into the gallery! I made a few more items for the store, but wanted to have one eye-catching statement piece. That ended up being this "fingers" necklace with matching earrings:

This took me a few weeks to complete because I had to cut each strip and then make the chain. It's heavy! But I know some women who love substantial jewelry, and this is for that person.

No that the weather is getting warmer and the days longer, I'd love to return to Brattleboro and actually see my work in the store. Oh, and to see my sisters-in-law, of course.

You can find many more of my pieces on my website, Naomi's Designs.

Tuesday, March 13, 2018

Fused Glass Cabochon Pendants Made With Glass Frit -- And A Glass Tutorial


I've loved making heart pendants with my glass molds and purchased a few other molds in different shapes. I have teardrop and trapezoid molds on order and I also have a circle design. The simple cabochon might seem like a very basic shape, but you can do a lot with a circle! After all, our entire solar system -- and beyond -- is made of circular and spherical objects.

So far, I've made two round pieces: my Sunrise Pendant and my Planet Pendant. I created these color combinations simply by arranging and fusing glass frit in a design. For the Sunrise pendant, I went with typical early-morning colors: red, orange, pink and yellow. I suppose this works as a sunset, as well, but I think of evening colors and being more red, pink and orange. That yellow adds brightness to the pendant and gives it more of a "morning" feeling.

For the Planet Pendant, I simply combined blue, green and white glass so it looks like a continent surrounded by water and ice caps. It's not quite Earth, but similar. I've named it "Naomius" because why not?

I'd love to try making a Jupiter-like pendant with stripes or even a wire wrapped Saturn pendant. My friend Judith suggested that I make a cabochon to represent each planet in our solar system and then put them together in a mosaic or shadow box, but that seems a bit too 7th grade science fair project to me. Jon likes her idea, though, so maybe they're on to something.

In other news, I did something today that I haven't done in YEARS. I wrote an article for HubPages. For a while, I wrote for them almost every day -- especially after I left the magazine -- but it was a lot of work. Eventually jewelry and life took over and I had less time. It's a great way to get one's name out, though, and is another way to advertise my business. So I put together a tutorial on making basic fused glass pendants with a microwave kiln. I go into pretty thorough detail on the types of glass you can use, and how you can best use the microwave for this project. I also have photos of my work. I've included links back to my various sites, which helps me, but at the same time, I hope my tutorial can encourages others to take up glass fusion. It's a win-win! You can see it here at HubPages.

If you're not interested in making your own glass jewelry or art, please check out my page. Naomi's Designs. I'm constantly updating that, as well as this blog, so be sure to stop by often!

Monday, March 12, 2018

My Fused Glass Mosaic Is In A Gallery!


It's been a bit more than two years since I started working with fused glass and I'm eager to make bigger and more complex pieces. I LOVE making jewelry and my microwave kilns were a fantastic investment, but I'd really like to create vases, sculptures and larger art forms. Since I still only have my microwave kiln, I've had to get inventive in what I CAN do -- and have designed several fused glass mosaics. My hard work has paid off, though, because my piece, "Winter Frost" is currently on display at a gallery!

I made this mosaic by using clear dichroic glass, which I layered and fired multiple times. From some angles, the glass appears to be clear, but from other viewpoints, it's very colorful. I was inspired to create the piece when I saw some frost on the ground during a sunrise. I am not usually awake that early, so it captured my attention!

"Winter Frost" is part of an exhibit called "Of Women," which is at the Studio 7 Gallery in Fort Tilden, Rockaway, NY. Fort Tilden, as you may have guessed, was once a military base out in Queens. Many of the buildings are in ruins, but several have been converted into galleries and a theater. The compound is right near the beach and is in the middle of Riis Park. It's isolated, but apparently well known. I've been told the area is packed in the warmer months.

"Of Women" runs through April 8, celebrating Women's History Month. The exhibit isn't so much about women as it is about honoring female artists. True confession: Winter Frost is not my favorite mosaic. It's not the one I would've chosen for this exhibition. But once I saw it hanging on the wall under the large amethyst sculpture, I could see just how it fits in.

As you can see, Of Women features some very talented artists. The gallery itself is stunning and I still can't quite believe that I'm a part of this thing. I went there on Saturday to do my volunteer shift and really enjoyed looking at the other ladies' masterpieces.

Far Rockaway itself is kind of a pain to get to. It's in Queens and is part of NYC... but it's in the middle of nowhere. I didn't think the middle of nowhere exists in NYC, but it does! My neighborhood has a suburban feel, but we're near the subway, LIRR stop and several bus routes. It's easy to get around and takes 15 minutes to get to Manhattan. Rockaway does have an LIRR stop and subway, but you have to switch trains several times and then take a bus to Fort Tilden. The first time we went there, we took three trains and two buses -- remember, we were just traveling in Queens!. We then discovered that you can take a bus almost all the way back to our area, so that cut down on the travel time. Still, it takes about 90 minutes to commute in our own borough!

Rockaway is also super windy and cold. It's beautiful, though, and I'd love to return in the spring when it's warm enough to walk along the boardwalk. While I was doing my gallery sit, my husband spent several hours crawling around the abandoned military ruins. Yes, this is how Jon entertains himself!

If you're in the NYC area, try to check out Of Women. I have one little piece in the exhibit, but there are many memorable and provocative paintings and sculptures. It's the type of exhibit that will stay with you for a long time.

Meantime, please check out my NEW Naomi's Designs website!

Friday, March 9, 2018

Making fused glass jewelry: glass scenery pendants


For the last two years, I've mainly been working with shiny dichroic glass. Lately, I've been working with other types of glass so I can make different kinds of pieces. Now that I finally have a professional website, I need to increase the variety.

I really like plain, old Bullseye sheet glass. Bullseye is the glass-making factory where most outlets get their materials. They make every color imaginable and it's all hand-pulled. It's actually kind of cool to see it being made because it looks a bit like the artists are pulling taffy. Because it's made this way, each sheet is slightly different.

My favorite sheet glass comes from a series called "Streakies." When I first read that name, I laughed because I have the sense of humor of a teenage boy. But it's not called this after naked folks running through a field. The glass has streaks of color, which allows for depth and shading when making pieces.

The streaked glass works really well for scenery pendants. When you deep fire dichroic glass, it'll hold its shape because the dichro is actually a coating on top of the glass. So a thoroughly-fired square patch will still look like a square. However, the sheet glass melts more intensely and the colors bleed into each other. You can't quite mix them the way you would with paint, but you can set them up so they run together.

I had some beautiful scenic glass decals, so I decided to try my hand at making sunset pendants. I layered red, orange and pink glass to make my sunset sky and fired the piece until the glass was fully melted and blended:

I then added the decals to finish the scenic effect. I love the reds and oranges, but you can use blues to create an ocean scene or greens and rainbow colors to design a field of flowers. I'm not a great painter, but these scenic pendants are prompting me to arrange the glass in realistic color sequences. Most of my designs are abstract, but I've been looking at photos, as well as the actual outdoors so I can get a better idea of how to use the glass for shading. For instance, you can depict an ocean scene by simply having a blue bottom half of the pendant. However, it looks much more realistic if you combine navy and turquoise blues, and have a touch of white thrown in for the foamy tops of the waves.

Today at Stein Senior Center, I had my students play around with sheet glass. I first had them make an abstract pendant, arranging the colors any way they liked. I then had them arrange pieces in more natural color combos. I'm firing their work right now and am excited to see how theirs turned out. Once they get the hang of it, we'll move on to adding the decals.

The great thing about fused glass is it's so versatile. You can sculpt with it, use it in mosaics or use it almost as paint. I'm eager to try everything!

Check out my NEW website, Naomi's Designs, for my latest jewelry and art pieces, news and craft fairs.

Monday, August 7, 2017

Silver wire wrapped jewelry set with fused dichroic glass necklace, earrings and bracelet


This weekend, Jon and I visited family in Brattleboro, Vermont. It's a small, artsy town filled with galleries and funky shops. We happened to be there for the monthly "First Friday" celebration, so we took in a ukulele flash mob (so much fun!), a chamber music concert, and then went on the gallery walk.

While on the walk, we stopped by an artisan gallery that's filled with handmade crafts made by local -- and out-of-town -- artists. Most of the work is stunning; there are clay vases, blown glass sculptures, paintings ... and jewelry. I was surprised to see how reasonably priced the jewelry was and ended up purchasing a pair of earrings. Jon then said to me, "You know, you should see if you can get your stuff into this store."

At first, I said, "No" because I was dressed very casually in shorts and a T-shirt, and figured that they only accept Vermont-based artists. But then I was like, "What the hell? I'm IN the gallery and the worst that can happen is I'm told, 'No, thanks.' It won't kill me to ask."

So I did and got an enthusiastic response from the clerk. She was impressed with my glass pieces and handed me an application, explaining that their submissions are juried. I'm fine with that. I just want the opportunity to try.

One of the pieces I plan to submit via photo is this abstract glass jewelry set. I actually made this to include in my application for the upcoming local art festival, but now it will serve a second purpose. Hopefully, it will yield positive results for both the store and fair:

I've made several other jewelry sets, but this one is more complex. This is seven layers of fused dichroic glass, both etched and clear. I carefully planned out how to place each layer, so I could get that particular abstract design.

The earrings and bracelet were harder to design than the pendant because they're smaller. I had to alter the pattern a bit so I could fit the layers into a tinier space. I also used fewer layers -- five for each instead of seven -- because I didn't want the earrings to be too heavy. Still, the designs work as one whole concept, even if the individual pieces aren't completely matchy-matchy.

Since so much is going on in the design, I went with a simple silver wire wrapped chain and band. I added in a couple of spirals to complement the pattern, but didn't want to go overboard with the crystals or geometric shapes.

A lot of people call my glass pendants "stones," which is incorrect. I have to explain that they're not actually stones, but glass cabochons, which I cut, shaped and fused. However, I really do think this pendant resembles a stone -- perhaps an opal?

This year has been all about stretching myself as an artist and businesswoman. My efforts have been paying off, but I still have a lot of work to do. It would be wonderful if I could get my jewelry into this gallery. I'd be in great company.

Check out the rest of my jewelry at Naomi's Designs and MayaGirl Creations.

Monday, July 10, 2017

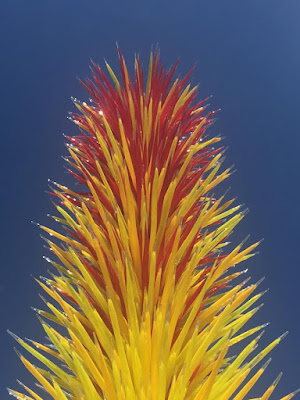
Inspiration for making handmade glass jewelry: visiting the Chihuly exhibit at New York Botanical Garden


When it comes to making glass pieces, I'm still fairly new to the discipline. After all, I've only been doing this for about a year-and-a-half. I'm skilled, but hardly an expert. I'm always looking for inspiration from artists who really are experts -- and none has been more inspirational to me than Dale Chihuly.

Yesterday, my husband and I spent the day at the New York Botanical Garden , which is currently featuring a few dozen Chihuly glass sculptures. His medium is blown glass and if you're not familiar with his work, take a look at these gorgeous creations:

He's been working professionally with glass since the 1960s and his art has been displayed in parks and gardens throughout the world. We're fortunate to have him in NYC through October -- so if you're in town, definitely go to the exhibit.

Much of his work is inspired by nature, especially the sea. This is evident in many of his whimsical pieces, which resemble shells, seaweed or coral. What's really amazing about his sculptures is how well they blend into the real plant life. In some cases, it was difficult to tell which was real and which was glass.

The exhibit itself is present throughout most of the garden -- which is enormous. Jon and I covered over six miles walking around it! That said, it feels almost like you're on a scavenger hunt as you wander from section to section, searching for Chihulys. We could usually spot them by the huge crowds that gather around the pieces.

It was difficult choosing a favorite, but I think I'll have to go with those first three that are pictured in this post. I especially like that blue sculpture, which is appropriately named "Sapphire Star." It's simpler than his other pieces, but I love the vibrant colors.

When you get up close to these sculptures, you can see the details he puts into his work. For instance, his iceberg piece has actual cracks in the ice. Meanwhile, his glass "leaves" have the various shades of green that you'd see in a real plant. I know a tiny bit about glass blowing because they teach it at Brooklyn Glass, but I didn't realize you can add so much detail.

Jon would like to take a glass blowing class; meantime, I plan to show my photos to my students so they can see just what can be done with glass. His work has inspired me to be a bit more experimental and I hope it encourages them to be bold when coming up with their designs.

I'm no Chihuly, but you can still check out my jewelry at Naomi's Designs and MayaGirl Creations.

Friday, July 7, 2017

Teaching handmade jewelry: my new teaching job!


Last week, I began an exciting new job: teaching fused glass at the Atria Senior Residence right near me. The Engage Life Director has titled it "Naomi's Jewels." Snazzy, right?

I've been playing flute there for two years and have done a couple of jewelry sales for the seniors, but the Atria was looking for some "different" programs to be included in the lineup. Glass jewelry fit that description! My class is being held once a month, which is perfect for my freelancing lifestyle. It's being held often enough that I can count on a paycheck, but is still rare enough to be special. Since I now teach at three places, I can rotate and devote time to each venue.

What's nice is that I already know most of the staff and residents so I'm not the "new girl." My close friend Judith is assisting me, so we're getting to do something together outside of music. My first class also happened to be held on the first day of the newest Engage Life staffer, so she helped out, as well. She's young and enthusiastic, and has an art background, so she was perfect.

The class is being held in Cafe Atria, which is a small kitchen area with tables and chairs, a toaster and microwave. It's adjacent to the front hallway, so it's open and bright, and people are constantly walking by. I like this set-up because it's much more comfortable than being crammed into a back room.

10 seniors showed up for my class, including two men! I rarely get male students, so I was delighted to see them there. One planned to make a pendant for his daughter, while the other just wanted to try something new.

I kicked off with my easiest project: making mosaic pendants. This is great first lesson because it lets my students play with the different types of dichroic glass. I cut about a hundred small pieces for them, giving them access to glass in many colors, textures and patterns.

The biggest challenge that comes from working with this group is that several have memory problems. I had to be extra-careful to keep them safe. I filed and blunted the ends of every single glass piece and constantly reminded them to not go near the hot kiln. I also assured them that if they needed help, they shouldn't be shy about asking. Some were able to assemble their pieces without assistance, but many did need help. They told us where to place the glass so they did have a hand in constructing their pendants. The idea behind these programs is to not only do something fun, but to keep their minds active. I'm so proud of the designs they came up with.

All of these students are in their 80s and 90s, but none have ever worked with glass. They were so enthusiastic and enjoyed learning something new -- even at their advanced ages. As one said, "It's never too late to try something different." I love that attitude!

Since I live so close, I fired the pieces at home and returned with them a few days later. The best part was watching the seniors open the envelopes with their jewelry. They were so pleased! Here are a few, showing off their work:

I returned to the Atria on Tuesday to do an impromptu Fourth Of July program with Judith. We played patriotic songs on flute -- and kazoo! -- and wandered all over the building. Many of my students were wearing their pendants and stopped me to say how much they loved my class. As cheesy as it is to say this, that meant so much more to me than the money (though I appreciate that, too!).

I've come up with a long list of projects and am so looking forward to this month's lesson. I never expected my music to take me in such an unusual direction, but I'm glad it did.

Check out my jewelry at Naomi's Designs and MayaGirl Creations.

Tuesday, April 4, 2017

Silver wire wrapped glass tarot card necklaces with spirals and crystals


It's only a few weeks until the Readers Studio tarot convention and I've been busy! I'm very excited because I actually managed to find tarot card decals. They're designed by a wonderful shop called Stained Glass Elements. The artist makes all sorts of unique glass decals, including a set of the 22 tarot cards from the Major Arcana -- a suit in the 78-card deck.

The decals came with 27 pieces, representing the 22 cards: 21 larger pendant decals and then six tiny "World" card images. Each of the bigger decals is about 1 1/2 by 1 inch; the perfect size for a pendant. I made several wire wrapped statement necklaces, featuring a spiral and crystal design. The rest will be simple pendants attached to a cord. I then used the "Worlds" to make tarot rings and charm bracelets. Because the decals are on a clear backing, I used a simple white glass base.

I'm still learning the basics of tarot, so it felt a little weird to be making "Death" and "Devil" pendants. For the fancier necklaces, I went with more pleasant images, like "The Star" and "The Magician." However, my friend Judith explained that all of the cards will hold meaning for people and that some might want a "Death" pendant if it's associated with their birth sign. She likes my plan of selling fancy and simple necklaces, noting that men and women can wear the cord-based pendants.

Making these pieces has helped me get to know the cards in the deck, or at least the ones from the Major Arcana. My favorite is The Star. I love the strong woman who's confident in her nudity and the contrast between the blue of the water and the sky. What's interesting is that this card is apparently Aquarian and I'm an Aquarius. Again, I really don't know much about tarot or astrology, but it does make sense that I'd be drawn to this particular image.

A funny thing happened when I was firing my last batch of pendants: I placed a couple too close together, put the heat on a little too high ... and "Death" and "Justice" fused. It was freaky! When I showed my husband, who is an attorney, he joked, "Sounds like a day in the office." I cut them apart so they wouldn't crack, but it was an odd coincidence that those two cards happened to connect.

I really hope that the convention attendees like my work. I think I'm portraying the cards in a way that's beautiful and respectful, but still reflects my jewelry style. For more of my handmade jewelry, check out Naomi's Designs and MayaGirl Creations.

Sunday, March 19, 2017

Handmade fused dichroic glass jewelry: hand etching glass with etching cream!


I got a new, fun "toy" to add to my arsenal of glass-fusing supplies: etching cream!

I've been wanting to etch my own designs for a while and finally got around to actually purchasing the cream. I use a brand called Armour Etch, which you can order online or buy at most craft stores for about $8-10 US. The bottle I got is small, but a little goes a long way. This stuff is AMAZING.

Whenever I etch metal for champleve enamel pieces, I have to soak the copper in ferric chloride for at least three hours. With etching cream, it takes about five minutes for a design to appear. Basically, you apply the cream to any area of the pre-fired dichroic glass you want etched -- and it works best on glass with a coating like dichroic -- let it sit for a few minutes, rinse and then voila! You have an etching.

An important warning: this stuff is potent! When working with it, you should wear rubber gloves, safety goggles and a surgical mask. I also opened a window. You do not want to breathe this stuff in. It's strong enough to corrode glass in a matter of minutes. It will definitely burn your skin -- and your nose hairs.

Once I suited up, I got to work. Using my thinnest paint brush, I attempted to etch a design... and it turns out, the cream is a bit goopier than I thought it would be. It took a while to get used to working with it, so my early designs are a mess. I also learned that you need to apply at least two coats to each area because I had to re-do a few designs that hadn't etched properly.

Now that I've gotten the hang of using it, I'm having a blast. As you can see from my photos, I've experimented with making abstract designs and with using negative space to frame objects like the cat or hearts. I had to go over the black areas with cream a few times to fully strip the dichroic coating. Now I know that it'll take at least two applications to get the black nice and shiny.

My designs were all drawn free-hand, but you can also use stencils or transfer an image onto the glass to then etch. I applied a very light layer of cream just to outline my designs and then went over the lines with the rest of the cream. Stencils are fun, but since my desire to etch is so I can use my own patterns, I'd rather do them free-hand. Besides, I'm already working with decals and pre-made laser-etched glass. Now I have many different options.

I've seen some incredible etched pieces on Pinterest. Some artists have created landscapes or have etched intricate mandalas. Meanwhile, I'm happy that I managed to successfully paint the cat. I'm really enjoying the work, though, and have so many more ideas. Between my etching, decals and wire wrapping, I have plenty to keep me busy.

Check out the rest of my handmade wire wrapped, fused glass and enamel jewelry at Naomi's Designs and MayaGirl Creations.