Showing posts with label heart necklace. Show all posts

Tuesday, January 17, 2017

Handmade silver wire wrapped Celtic knot heart pendant


I often get customer orders where I'll be asked to replicate an item that was lost or broken. This was the case when a customer recently asked if I could make a copy of a Celtic knot heart necklace she'd once owned and had misplaced.

To get started, she sent me a photo of her old necklace. This piece had been made with thick silver, which had been cast and soldered. I explained that I don't solder and could do a version that's wire wrapped instead. I noted that while I wouldn't be able to do an exact replica, I could make something in a similar design.

I've never made any pieces involving Celtic knots and they're pretty complicated. My way of working through this was to tackle the pendant piece by piece. I had to do a lot of adjusting so that I could incorporate the wraps. I swear, sometimes I feel as if I'm a structural engineer...

My first challenge was creating the heart within the heart. The original consisted of a much larger outside piece and then inner knots kind of "floated" within the frame. However, I needed them to be close to the edge so I could effectively wrap and attach them. Because of this, the double heart is a bit smaller than the original.

Next, I needed to make and attach those outside scrolls. Making them wasn't too difficult, but securing the 14-gauge wire took some trial and error. At first, I centered the scrolls on top of the heart and wrapped them with a bundle of thin wire. Unfortunately, the scrolls looked "bunched up," as my customer noted, and the wraps were way too bulky. Also, the thin wire I'd used was a shade darker than the thick, which gave the piece an industrial look -- definitely not what she wanted.

I purchased 26 gauge wire in a lighter shade so it would blend more easily and reoriented the scrolls so they were closer to the initial design. They now flow outward and are not squished in the center.

Those loops on each end are actually open curls in the original, but I had to close them so the chain will stay attached to the pendant. I also added an extra loop on the innermost scrolls so they'd be easier to wrap.

I put a lot of time into creating this piece and hope the customer likes it. As I said before, it doesn't look exactly like the original, but there was no way for me to make an exact replica when using different techniques. I'm always nervous when showing a finished result to someone who'd ordered a custom piece. Hopefully, it's close to what she wants!

Though I've been spending most of my time on glass jewelry, I'm still learning new ways to work with wire. Even if the customer ultimately rejects my work, I feel that I have at least gotten something out of the experience by trying something different from what I've done.

Check out the rest of my handmade jewelry at Naomi's Designs and MayaGirl Creations.

Monday, December 19, 2016

Abstract heart mosaic necklaces made from fused dichroic glass


I'm still learning how to cut glass into exact shapes because I find it difficult to score glass on a curve. It's much easier to cut it on angles. Therefore, I sometimes "cheat" and use pre-cut shapes for my base glass.

I love hearts, so I recently made these glass heart mosaic pendants:

These guys are about 1 3/4 inches by 1 1/2 inches. I'd purchased smaller hearts earlier in the year and all but one have sold. I wanted to try working with a larger canvas.

I may have saved some time by using pre-cut glass, but getting the mosaic shapes to fit is still pretty labor intensive. I had to make sure each piece fit and a lot of snipping and filing was involved. I wanted the pieces to fire evenly and not break, so I put them in my kiln for 15-20 second increments. This takes time, but I like using this method because I can remove the glass at the exact right moment. I generally start with 30 seconds, just to heat the kiln, and then fire at 15-20 second intervals. I put on my gloves and protective eye wear, and lift the kiln after each interval so I can see where the glass is on the firing schedule. With an industrial-sized kiln, you'd set the timer on a schedule so the glass slowly cooks over the course of several hours. Since I don't have that option, this is my modified version of that process -- and it works!

I LOVE these pendants, though. They're so colorful and pretty. I gave the one with the red section to my friend Nancy for Christmas. And I wore the one with the orange and green swirls. I'm actually thinking of keeping it. Imagine that? Me keeping a piece of my own jewelry!

Nancy was excited to receive her heart because she'd purchased one of the smaller mosaics from me. She likes to layer necklaces so her plan is to wear the bigger heart on a long chain and then pair it with the smaller heart, which she'll wear on a shorter chain. I'll have to get her to model the jewelry for you.

Because I love these hearts so much, I ended up buying huge pre-cut pieces that are several inches across. I hadn't realized just HOW large they are, but they're coaster-sized. Way too big to wear as pendants! I've worked on one so far, just to see what it would look like, and think these could make nice holiday ornaments -- or even year-round suncatchers. I mean, Christmas ornaments don't HAVE to be in the shapes of trees or gingerbread people, right? Sure, hearts are associated with Valentine's Day, but this is supposed to be a season where one celebrates love and family. Why not a big heart?

Check out the rest of my handmade jewelry at Naomi's Designs and MayaGirl Creations.

Tuesday, July 10, 2012

Handmade enamel and cloisonne necklaces

I had my second enameling class in Brooklyn last night. There were fewer people so there was much less waiting in line for the minimal equipment. I'm also starting to get used to this kiln, which fires a lot lower than the ones at the Y. I basically need to keep pieces in for two minutes instead of one.

One thing I like about this teacher is she lets you do your own thing. She doesn't jump to help you, but is readily available if you do need her help. I like that she just lets us practice on our own. Most of the teachers I've had would jump in to correct me, and one -- who I liked -- would often end up DOING my work for me. I like being able to work on things without so much interference because I can then learn from my mistakes.

For instance, this teacher showed us how we can apply the first coat of enamel simply by torching the piece rather than putting it in the kiln. I actually really like this technique because you get to see the enamel glaze over and turn from pieces of sand into glossy glass. It looks as if you're frosting your jewelry! But this technique doesn't always work. I attempted to torch a butterfly shaped stamping ... and the force of the flame kept knocking it over. I tried about four times and finally gave up, simply putting the butterfly piece in the kiln. That worked! But at least I got to try and see what happens. As our teacher keeps telling us, with enamel, you can always redo and fix things. I like that!

I did manage to finish one piece. I made a small heart pendand for my kids' shop. After feeling like such a dunce in some of my other jewellery classes, it's nice to feel capable here. Some of the other students had a hard time getting the cloisonne wire to stay put, but I got it on the first try! Here is my red heart pendant necklace with fine silver cloisonne:

And this is the weird-looking abstract piece that I made last week:

To purchase my jewelry, head to Naomi's Designs. To purchase my children's jewellery, head to MayaGirl Creations.

Monday, March 26, 2012

Mixed Metal Copper And Silver Jewelry Pieces

Now that I'm taking a metalsmithing class, I have so many more ideas for pieces. Being able to saw and drill jewelry is a useful skill and gives you so much more room for creativity. That said, I'm now making a series of mixed metal jewelry pieces made of copper and silver.

One is this copper heart that's wire wrapped with silver. I decided to combine my skills and created an industrial looking heart that hangs from a silver chain. That chain is handmade, too, by the way, and took a million years to make. Sawing the heart was a challenge because you have to get that top curve and the indentation, but I like how it came out:


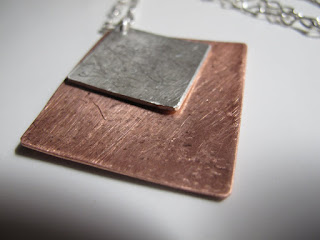
The next piece I made consists of a small silver square hanging over a larger copper square. I turned each on an angle to make them look like diamonds and hammered each to give them texture. This chain is also handmade. One thing to note: silver is harder than copper so it takes longer to saw. It also takes much more force.

This piece is very abstract, but I love the combo of the metals. I plan to get some brass sheets, too, so I can play around with those.


To purchase these pieces or my other jewelry, head to Naomi's Designs.

Monday, February 21, 2011

Silver necklace with green Swarovski crystal hearts

I'm in love -- with Swarovski crystal hearts, that is. I got a bunch of these little guys on sale a while back and think they're so, so pretty. I love heart-shaped gems, anyway, but seeing them in all of these different, shiny colors just about sent me over the edge.

I've been waiting to get the right inspiration when it came to designing with these Swarovski hearts. I didn't want to just hang them on a wire and call it a day; I wanted to do something special with them. I'd already designed a multi-colored cuff bracelet with them, but looked forward to coming up with more great ideas.

This particular necklace came about due to me wishing it were spring. This winter has been terrible, because of the snow and multiple colds for me, so I'm longing for some warm days ahead. To me, spring is a happy season filled with sunshine, flowers and a lot of green. That said, this necklace with the light green hearts represents my love - heh -- of nature and of things coming back to life after a long winter.

To make the necklace, I used 18 gauge silver wire and twisted it into a simple vine shape. I originally wanted to make an entire necklace out of the vine pattern, but it kept getting tangled and looked more like poison ivy than a beautiful, winding leaf. I nixed that idea and went with a simpler version of the design; I then hung five green Swarovski crystal heart "leaves" onto the vine. The end result is that it looks like a tree is just starting to bloom.

This spring, I have a lot to look forward to -- my wedding anniversary, a trip to Greece, long days outdoors. This necklace celebrates that.

To see or purchase more of my jewelry, head to Naomi's Designs or Naomi's Studio.