Friday, June 21, 2013

Wire wrapped double daisy dangle earrings


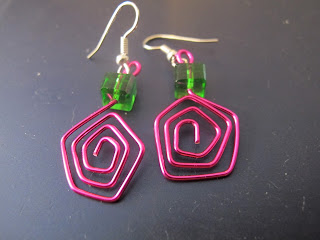
One of my best-selling items at MayaGirl Creations have been my wire wrapped daisy flower earrings. In honor of it being my store's first anniversary, I designed a variation on this popular piece: double daisy dangle earrings:

As you can see, these earrings have two daisies instead of just one! They still have the colorful flowers in purple, hot pink, pink and aqua blue, but they're adorned by a smaller silver daisy.

I initially thought about mixing colors -- purple and blue, for example -- and still might do that, but I like how the silver looks with each. It's fun and colorful, but elegant. I also had to make these daisies a bit smaller than the single-design ones because I don't want them to hang too long in children's ears. I like the result, though, and think they're a fun addition to my shop! Check it out, as well as my other store, Naomi's Designs.

Enameling techniques: champleve, working with ferric chloride


Part of the reason why I haven't blogged much lately is because I've been studying a new enameling technique (well, new to me, anyway, since the technique itself goes back to ancient times): champleve.

With champleve, you carve out a design or groove into a piece of metal and then fill that depression with enamel. The piece then looks as if it's been inlaid with the glass and the design has a lot of depth and texture.

There are many ways in which you can carve the piece: you can engrave it, cut out an opening in one piece of metal and then solder it onto a backing (and then have subsequent pieces cast), or, as I'm doing, you can burn the metal with an acid.

Different types of metals require different acids to burn. I've been using copper so ferric chloride is my substance of choice. Silver uses nitric acid, but this substance is extremely dangerous to use, which is why I'm avoiding it. Eventually, I'll have some copper pieces cast in silver or silver plated.

To actually burn out the design is pretty easy. I start with a thick piece of copper -- 16 or 18 gauge -- and apply a resist to all of the areas that I DON'T want to burn. This means that if you want to have a triangle-shaped depression, you cover all of the areas of the metal EXCEPT for that triangle. You can use many things as a resist, but I like nailpolish because it's sticky and stays on for a long time without breaking up. The downside is that it's difficult to draw fine lines with it. A paint pen might be a better choice if you want to create a more exact, detailed design. I make sure to paint all of the necessary areas, including the sides of the metal, with the polish and then cover the back of the metal with some contact paper. I then place the metal FACE DOWN into the acid. Also important: I don't just plop the metal into the acid. I keep it suspended on some flat sponges, which I cut into strips. Whenever I remove my pieces, I use copper tongs -- and I always wear goggles, a surgical mask and latex gloves. Most pieces take at least three hours to get a nice, deep groove.

As I'm sure you've guessed, working with acid is DANGEROUS. Kids, do NOT try this at home. Actually, do not try this at all!!!!! Adults, do not try this without proper safety gear and without first learning the basics. I'm still nervous whenever I have to work with the acid. One wrong spill and you can get seriously hurt.

I keep my acid in a Tupperware container, which obviously will not be reused for food! You can store it and reuse it a few times, though it does eventually lose its effectiveness. You can't just dump it down a drain; I first neutralize it with baking soda. Again, this is serious stuff!!!

Anyway, I've managed to carve out some interesting pieces. Right now, I'm working on a series of heart earrings made on 18 gauge copper:

These aren't yet finished. The enamel needs to be sanded so that it's flush with the metal and the copper needs to be cleaned and polished. But you get the basic idea of how the glass looks against the metal. The toughest part for me, so far, has been figuring out how to apply certain colors. Because the glass is going into a groove, the colors come out much darker than they do when they're simply applied to the copper's surface. I finally figured out that it's best to first apply a coat of white or clear enamel and to then add the layers of color. You also need to heat that first coat for a bit longer than you normally would because again, the enamel is lower down.

Right now, I'm burning a square piece of metal with a square groove that will look sort of like a frame. I'm letting it sit in the acid for longer than usual because I want a very deep depression. I then plan to experiment by working with cloisonne within the groove. Next time, I'll show you a before picture so you can see what the burned-away copper looks like.

Meantime, check out my other jewelry pieces at Naomi's Designs and MayaGirl Creations.

Silver wire wrapped personalized name bracelet


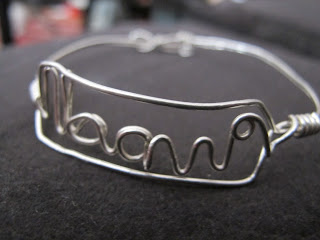
A couple of weeks ago, my husband went on a business trip to Seattle. While there, he purchased a little gift for me: a copper and silver wire wrapped name bracelet.

I'll be honest: at first, I didn't quite appreciate the gift because it looks just like something I can make myself. However, when he explained that he wanted to buy me something with my name because I can hardly ever find Naomi name jewelry, I appreciated it a lot more! How sweet was that? I now wear it all the time.

Still, I wondered if I really COULD make a similar bracelet. This one had a simple, but very efficient design; only one piece of 18 gauge copper wire was used. It was folded over onto itself and then given an adjustable band. The name was then wire wrapped into a middle section. Jon said that these were selling like hotcakes on the street and were going for about $20. Not bad for a mostly copper bracelet!

Well, the other day I had some time to kill before my enameling class so I hung out in Jon's office and decided to try my hand at this bracelet. I didn't have 18 gauge copper with me, so I used 18 gauge sterling silver wire. Other than that, though, I used a similar style to the mine. I got it, but know what? It wasn't that easy to make. The hardest part was the name because I needed to twist the letters in a particular way to make them recognizable and functional within the design.

Overall, I'm happy with how it turned out. I like how it looks in solid silver. I also made the name a lot bigger than the name is on mine. I have it up at MayaGirl Creations because it seems like the type of item that a girl would like. I can't take full credit for the idea, but this seems to be the standard design for name bracelets online (of which there are many). So I can't say that this is my most original creation -- but it does have my twist on it.

Jon has suggested that I sell these at my next craft fair, but I don't know if I can make them as quickly as the guy who made mine apparently did. I wish I knew his name so I can give him a shout-out. But, thank you, Seattle artisan for making my bracelet -- and for inspiring me to try my hand at it. I hope you sell many, many more!

Meantime, check out my more creative jewellery at MayaGirl Creations and Naomi's Designs.

Happy Anniversary MayaGirl Creations!


Hey there! It's been a really long time since I've written, but life has been busy. I'm back, though, for a special occasion: today is the one-year anniversary of my children's jewelry shop, MayaGirl Creations!

I came up with the idea for a children's jewelry line after a friend requested that I design some kids' pieces for an upcoming show. I then purchased a collection of colorful wires and beads, came up with some fun shapes ... and MayaGirl Creations (named for my cat, Maya, who's sitting on my lap right now) was born!

Designing jewellery for kids is a bit different than making pieces for adults. Kids like bright, fun jewelry so color is key; I use a lot of blues, pinks, reds, etc. Safety is also a very big deal. Of course, it's always important as you don't want to make necklaces that strangle the wearer or bracelets that'll poke someone in the wrist, but I'm extra cautious when it comes to making things for little ones. I blunt the edges of the wire so they won't accidentally poke themselves and use hypoallergenic surgical steel earring wires since most kids' ears can tolerate that material. I also recommend that kids under three don't wear my jewelry -- and that younger kids only wear pieces when an adult is supervising.

Another thing I've had to take into account is size. It should go without saying, but children have tiny hands, wrists and ears! Though my earrings are all dangle style, I try not to make them too long. I've also made a lot of my bracelets with an adjustable chain so that kids can grow into their piece. It still surprises me a bit when I realize just HOW small kids' need their jewelry sized. I feel like Godzilla in comparison!

So far, my most popular items have been my wire wrapped earrings. I've sold many at craft fairs -- to both adults and kids, in fact -- and a bunch online. One person even bought nine pairs from me, which was awesome.

My next most popular item has been my wire wrapped infinity birthstone ring. I've sold several of these to moms giving them to their daughters as gifts. I've also sold a few to adults who stumbled onto this site instead of my grown-up store, Naomi's Designs. I don't really care if they order from this site, though; as long as they give me the proper size, it's fine.

I haven't sold too many bracelets so I haven't made too many. Since earrings seem to be what kids like, I've been concentrating on those, though I do like to shake things up and add in different types of pieces. So far, though, it's been an exciting year and I'm happy with my shop's progress. Be sure to check it out, as well as my other shop, Naomi's Designs!

Sunday, May 12, 2013

Silver wire wrapped enamel and cloisonne cat pendant necklace


Well, my first craft fair of the season was a complete and total bust. We had some heavy rain yesterday, but the ad for the fair said "rain or shine" so I dragged my butt out of bed on a Saturday and schlepped down to the fair site. When I got there, I was told that most of the other vendors left because of the weather and the fair was cancelled. So much for "rain or shine!" I wish I'd just stayed in bed, but I paid a registration fee... and have now unfortunately lost money. They offered to let me sell today, but it's Mother's Day so I can't. My husband says not to worry about the lost wages, but it's frustrating. Grrr...

Still, I'm trying to look ahead. I have another fair coming up in a month and this one is for a great cause: the Leukemia & Lymphoma Society. I enjoy selling at charity events where I can donate a portion of my proceeds -- at least my money is going toward something worthwhile! Plus, it'll be indoors so the weather won't be an issue.

Meanwhile, Tuesday will be my last enameling class of this semester. The "summer" semester begins two weeks later, but I'm saddened that this particular class will be ending. We just happen to have a great group of people who get along really well. Most of the students with whom I've worked have been very nice, but many haven't been that into the craft we're learning. In most of my classes, there are only a few people left by the end of the semester. However, everyone has stayed in this class and everyone is really into enameling, which makes it all the more fun to learn.

What I also love about this group is that we spend many classes having interesting discussions about things other than jewelry making. Sure, we talk about enameling and go over projects, but as we work, we talk about politics, family, history, TV shows... any topic you can imagine. I've learned so many non-jewelry-related factoids from my fellow students and have shared a lot of laughs. When I originally signed up for jewelry a year-and-a-half ago, THIS is what I envisioned the classes would be like: places to learn a skill and meet some interesting folk. I didn't expect that first class to be so serious and, well... sucky. Anyway, we're having a party to celebrate our successful semester, which will be bittersweet for all of us. A few others will be in the summer class, but it won't be the same.

I don't know how much work I'll get done on Tuesday, but I did finish my latest piece: an enamel and cloisonné cat pendant with a silver wire wrapped chain:

I used the cloisonné wire to create an abstract design. I wanted it to suggest the idea of a cat's patterns, but to be a little surreal. I based the colors on my sweet baby, Maya:

As a cat lover, I can never get enough of cat-shaped things! Hopefully, another cat lover will fall for this item.

To purchase my jewelry, head to Naomi's Designs or MayaGirl Creations.

Friday, May 3, 2013

Tales From Enameling Class: Having A Great Week!


There are still days when I question my decision to make jewelry full time. After all, I've only been doing this for about three years and the work isn't as steady as when I worked for the magazine. I love working for myself, but wonder if I have what it takes to a) make it in this business and b) even be called an artist. Well, this was one of those weeks where my faith in myself was restored.

It began with me finishing my enamel and cloisonné hamsa pendant. I wrote a longer post about it, but here it is again. You can buy it at Naomi's Designs:

Meanwhile, I'm having a really good sales week over at my kids' store MayaGirl Creations. Next month will be that shop's year anniversary and I'm pleased with how it's shaping up. People seem to like my pieces online and at fairs so I'm glad that I took a risk in expanding.

The best part of this week, though, happened in my enameling class when my teacher paid me a huge compliment. She's praised my work before; in general, she encourages all of her students, but she took me aside and told me how good she thinks I'm getting and how proud she is of me. It felt great to hear this and for a moment, I went back in time to when I'd get a good report from my elementary school teacher, LOL. Still, it's great that she has faith in me, especially since she's been a successful jewelry designer for decades.

This month marks a year since I began enameling and I'm thrilled that I found a new skill which I love. I was very wary after taking that metalsmithing class, but I think you have to keep searching until you find something that you enjoy. I'm proud of myself for keeping at this and look forward to my next year as an enamellist.

Wednesday, May 1, 2013

Silver wire wrapped enamel and cloisonne hamsa pendant necklace


I finally finished my enamel and cloisonné hamsa pendant! I love how the silver foil layer came out. I applied it before I applied the enamel so that the pendant is shimmery and looks a bit like stained glass.

By the way, a hamsa (hand necklace) is a hand-shaped pendant that's meant to protect the wearer from the evil eye. Hence the large eye in the center of the hand. It's a traditional symbol that you see in Jewish/Middle Eastern jewelry. This was my first time delving into Judaica jewelry and I'm proud of how it turned out.

I haven't designed much religious jewelry, but one of the women in my enameling class has suggested that I make Godmother/communion gifts. I suppose I could make some enamel cross necklaces? I'd want to do something beautiful, classy and respectful. I'm about to learn some champlevé techniques (engraving into metal and then filling the depression with enamel) so I'm thinking of etching a cross into a pendant and then using that as a design.

Meantime, my teacher really loved this hamsa. She especially liked the eye and kept showing it to my classmates. She suggested I make more, but this was very time consuming! So for now, this will remain a one-of-a-kind.

Check out my jewelry at Naomi's Designs or MayaGirl Creations.